


StoneShot Learning > Contacts Lists > Managing Lists
Managing Lists
There are two types of lists you can create using the Platform: Static lists and Dynamic lists.
Static lists are an empty list that you build up adding contacts to them as you need to. These contacts don’t need to fit any criteria only that you have chosen to add them to a list. Contacts can only become part of a static list by you importing them into the list, or by manually adding them one by one.
Dynamic lists are highly flexible and are built by applying filters to all contacts within your account. You pick your criteria such as ‘Relationship manager is Mr Smith’ and ‘Contacts have been opened an email’, which narrows down your list. One big plus of a Dynamic list is that contacts will be added or removed from your list automatically as they meet the criteria.
Creating Static lists
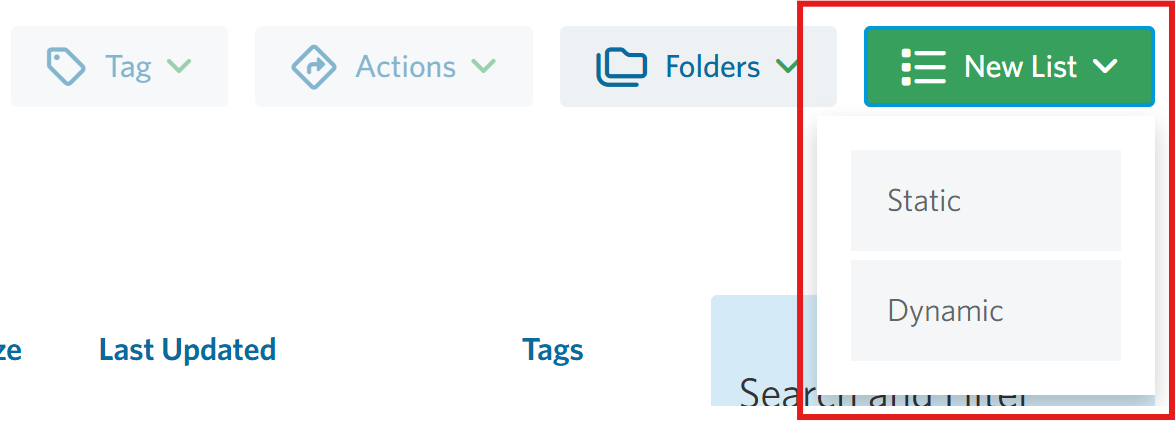
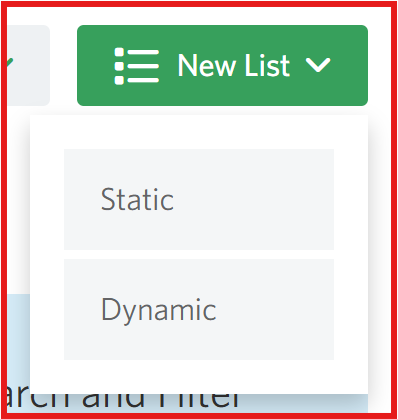
When you’ve logged into the StoneShot Platform, head to Contacts > Lists and click on the New List button. From the dropdown, select Static.
You’ve now created the basis for your new static list! As we’ve used a default name, you might want to edit the name to make it more useful. Click on the Edit pencil on the top left and you’ll be able to edit the name of your list, set any Teams against the list that should have access, and Tag the list if that is required.

Now, you can add contacts to your list either by importing (find out more on the importer here) or by adding existing contacts who are already in your account.

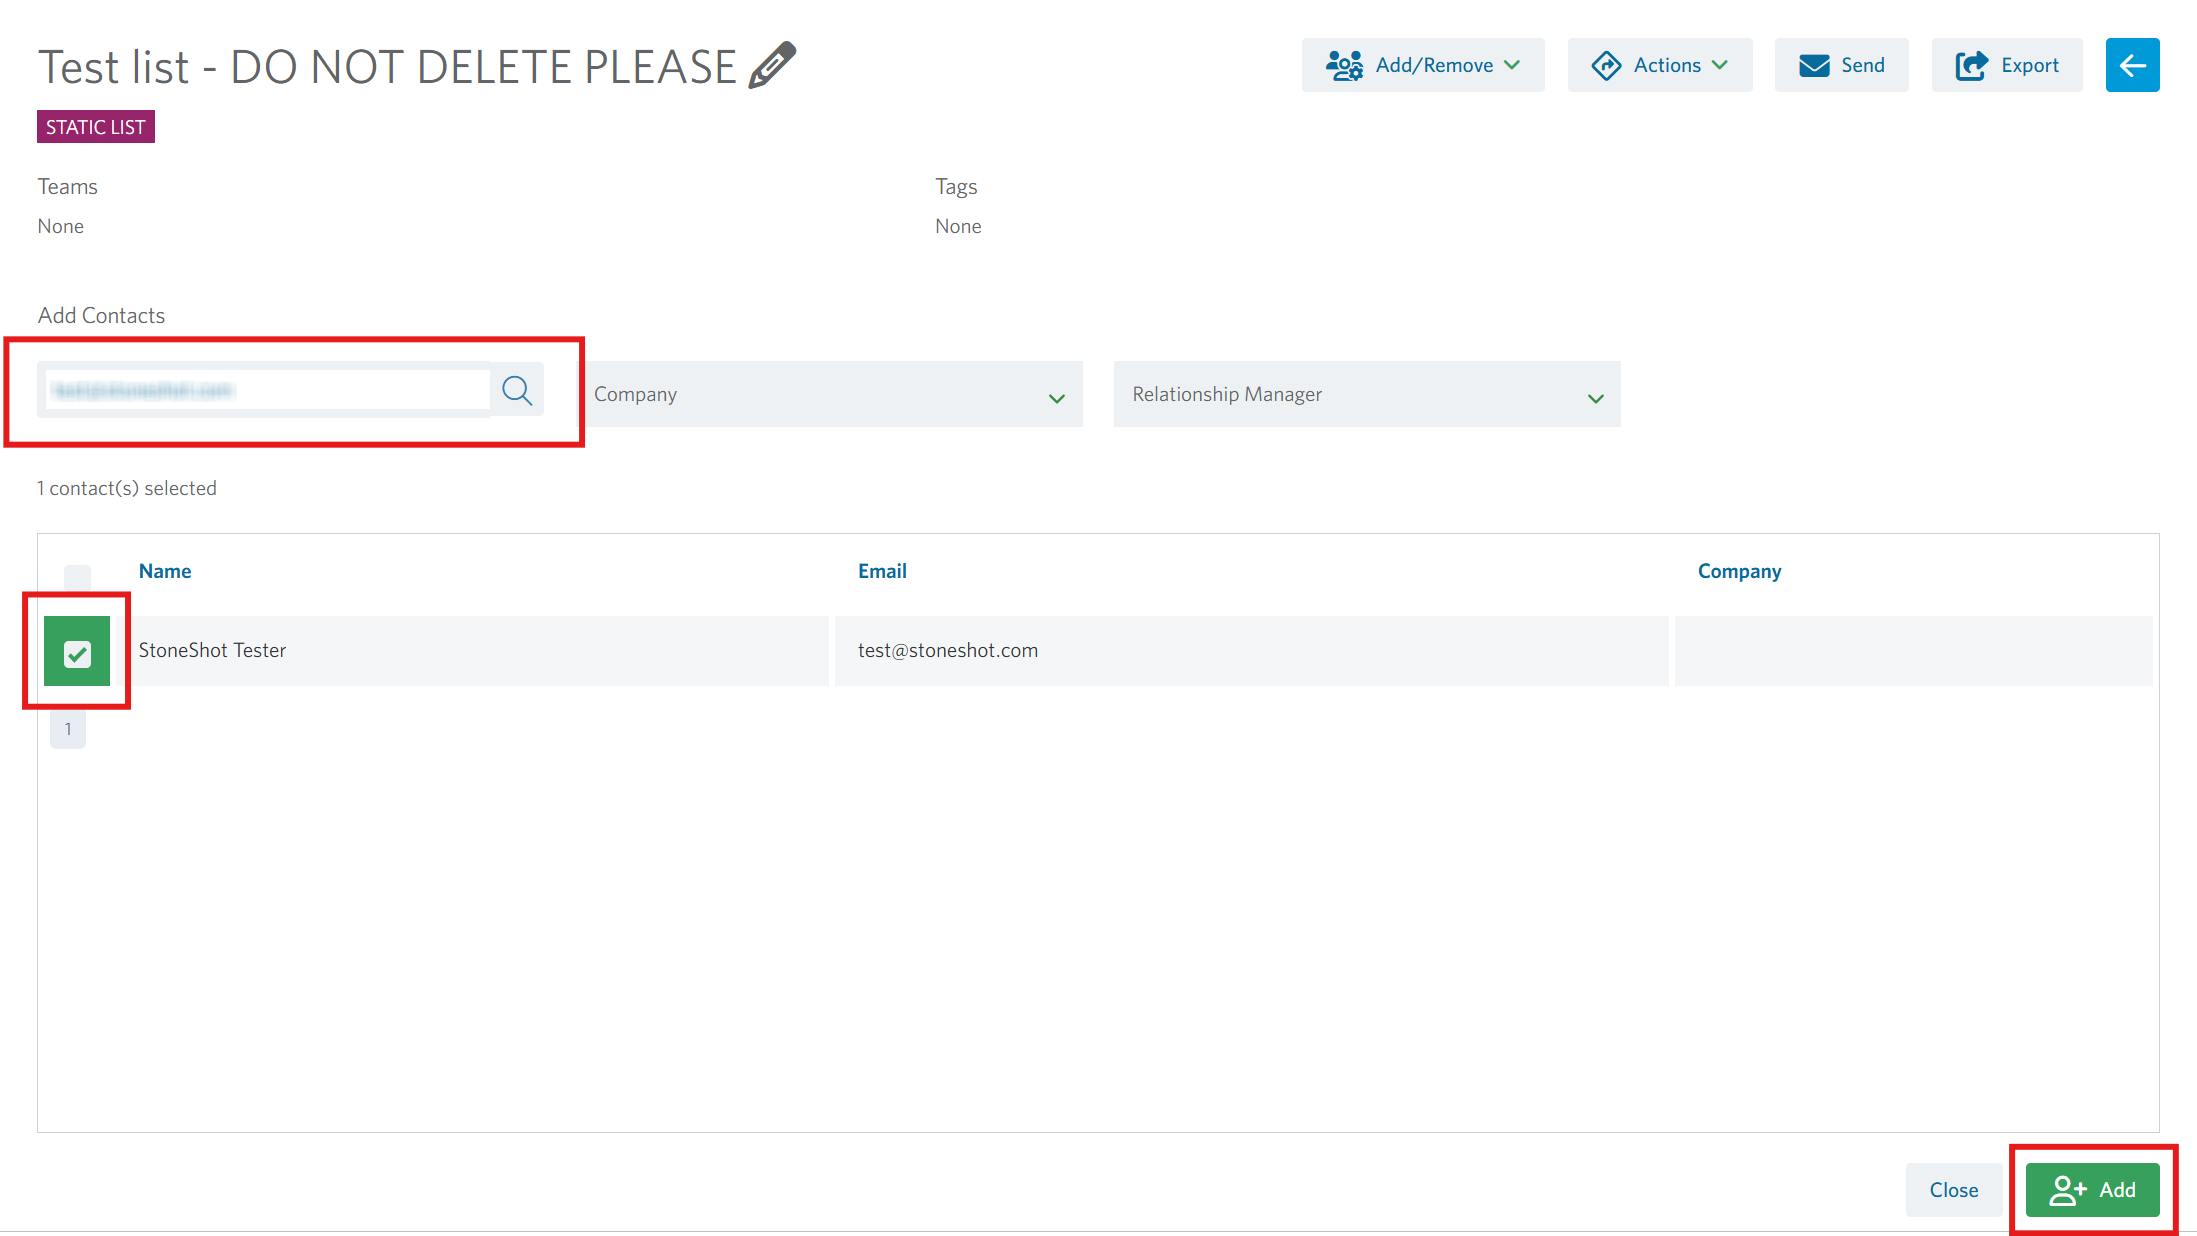
Click on Use existing contacts and you’ll see a list of contacts who exist. You can search through for individual contacts using the search bar, the Company dropdown or via the Relationship Manager dropdown:
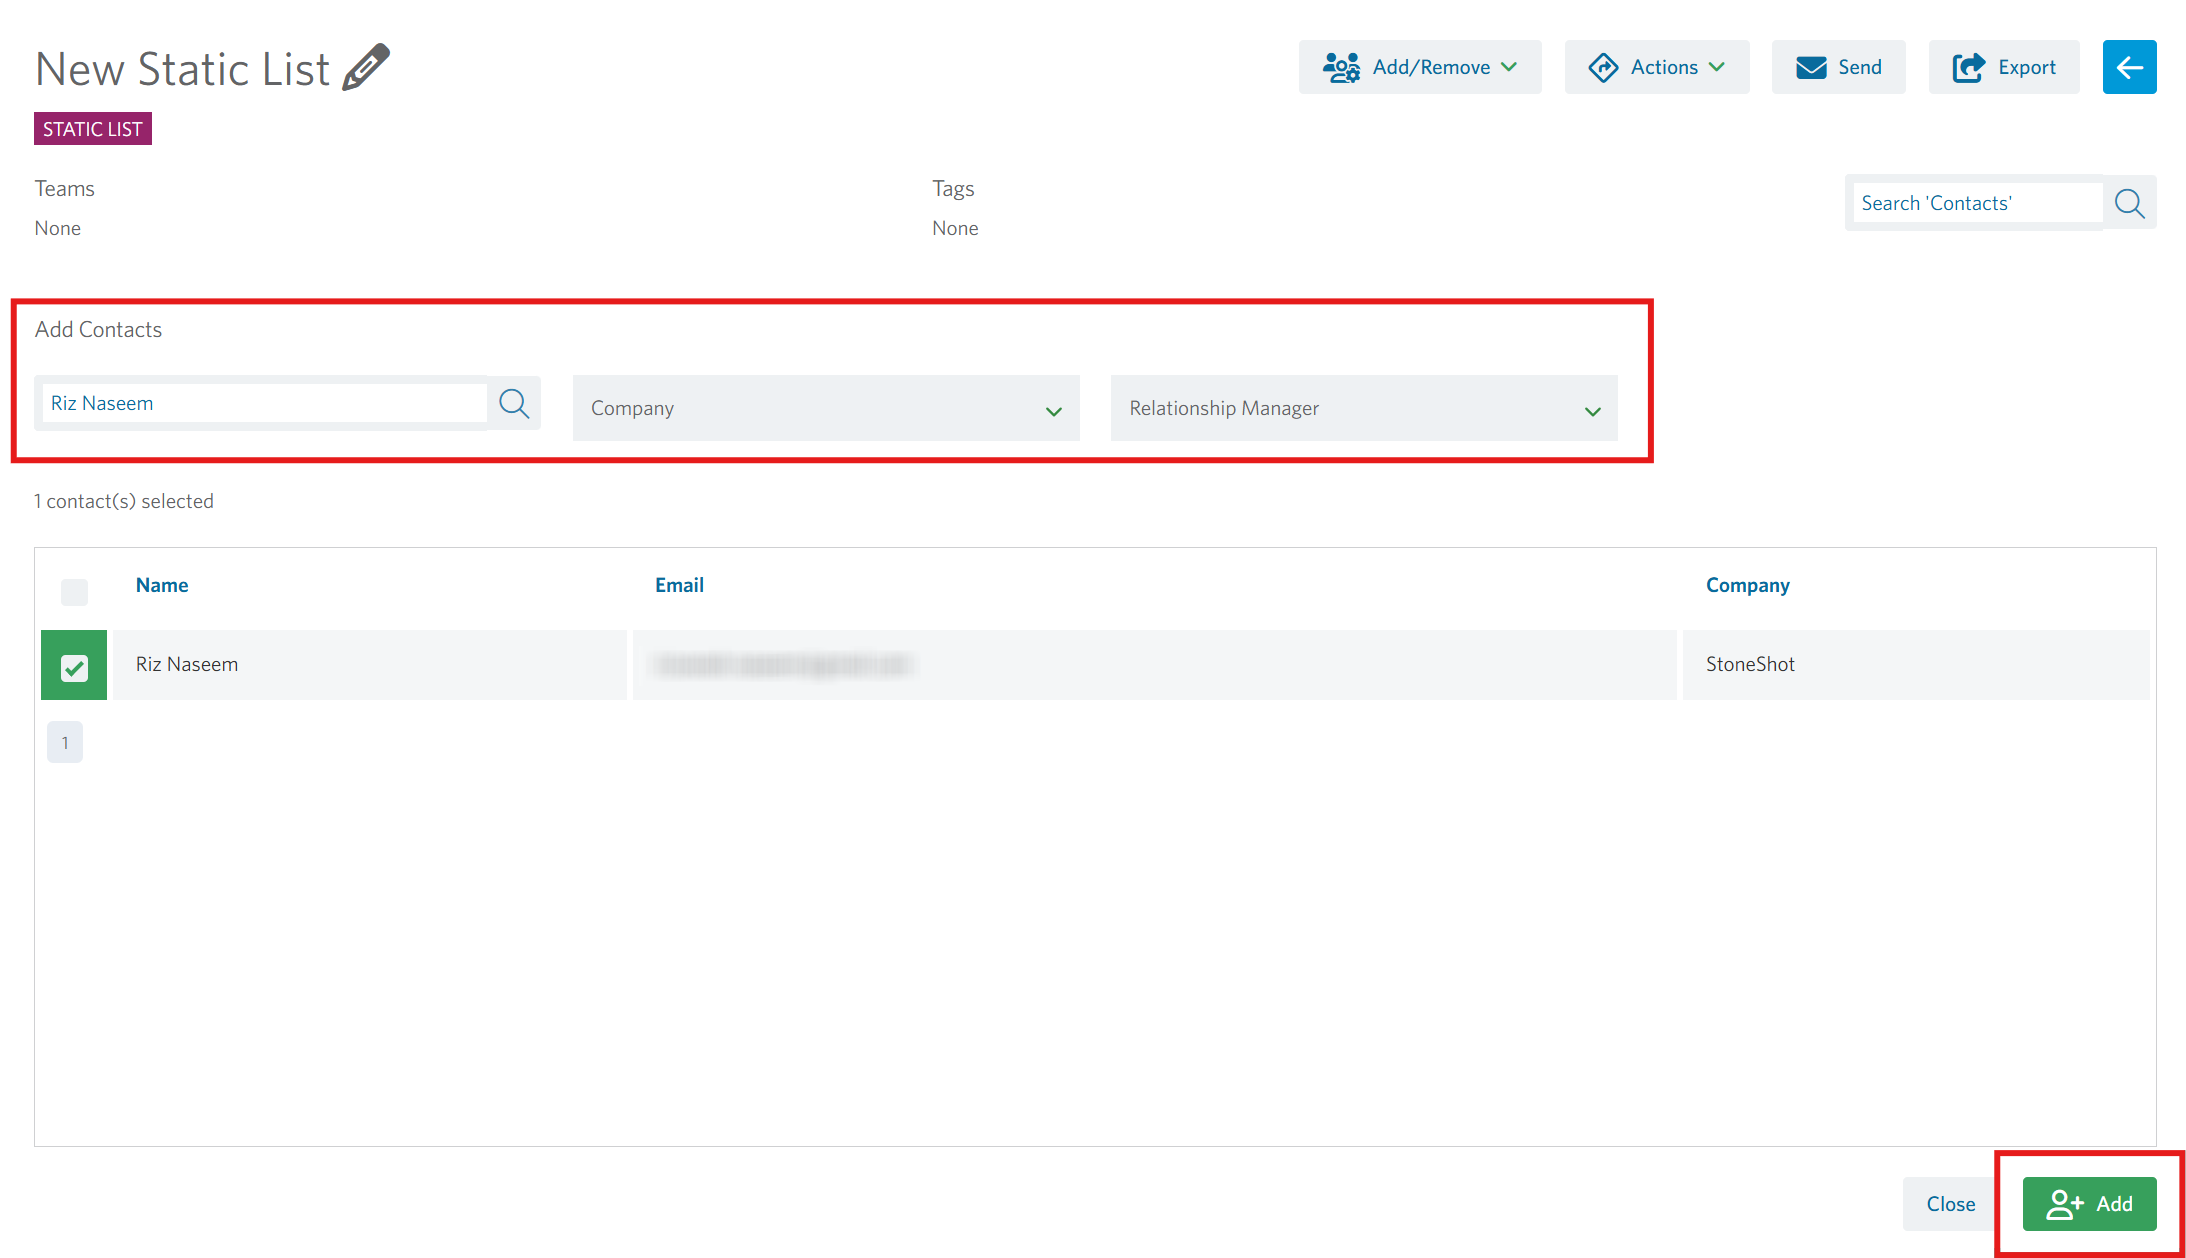
Once you have found the contacts you wish to add, tick the contacts using the checkbox on the left-hand side of the screen, or select all contacts on the current page by clicking the top checkbox, and click on the Add button.
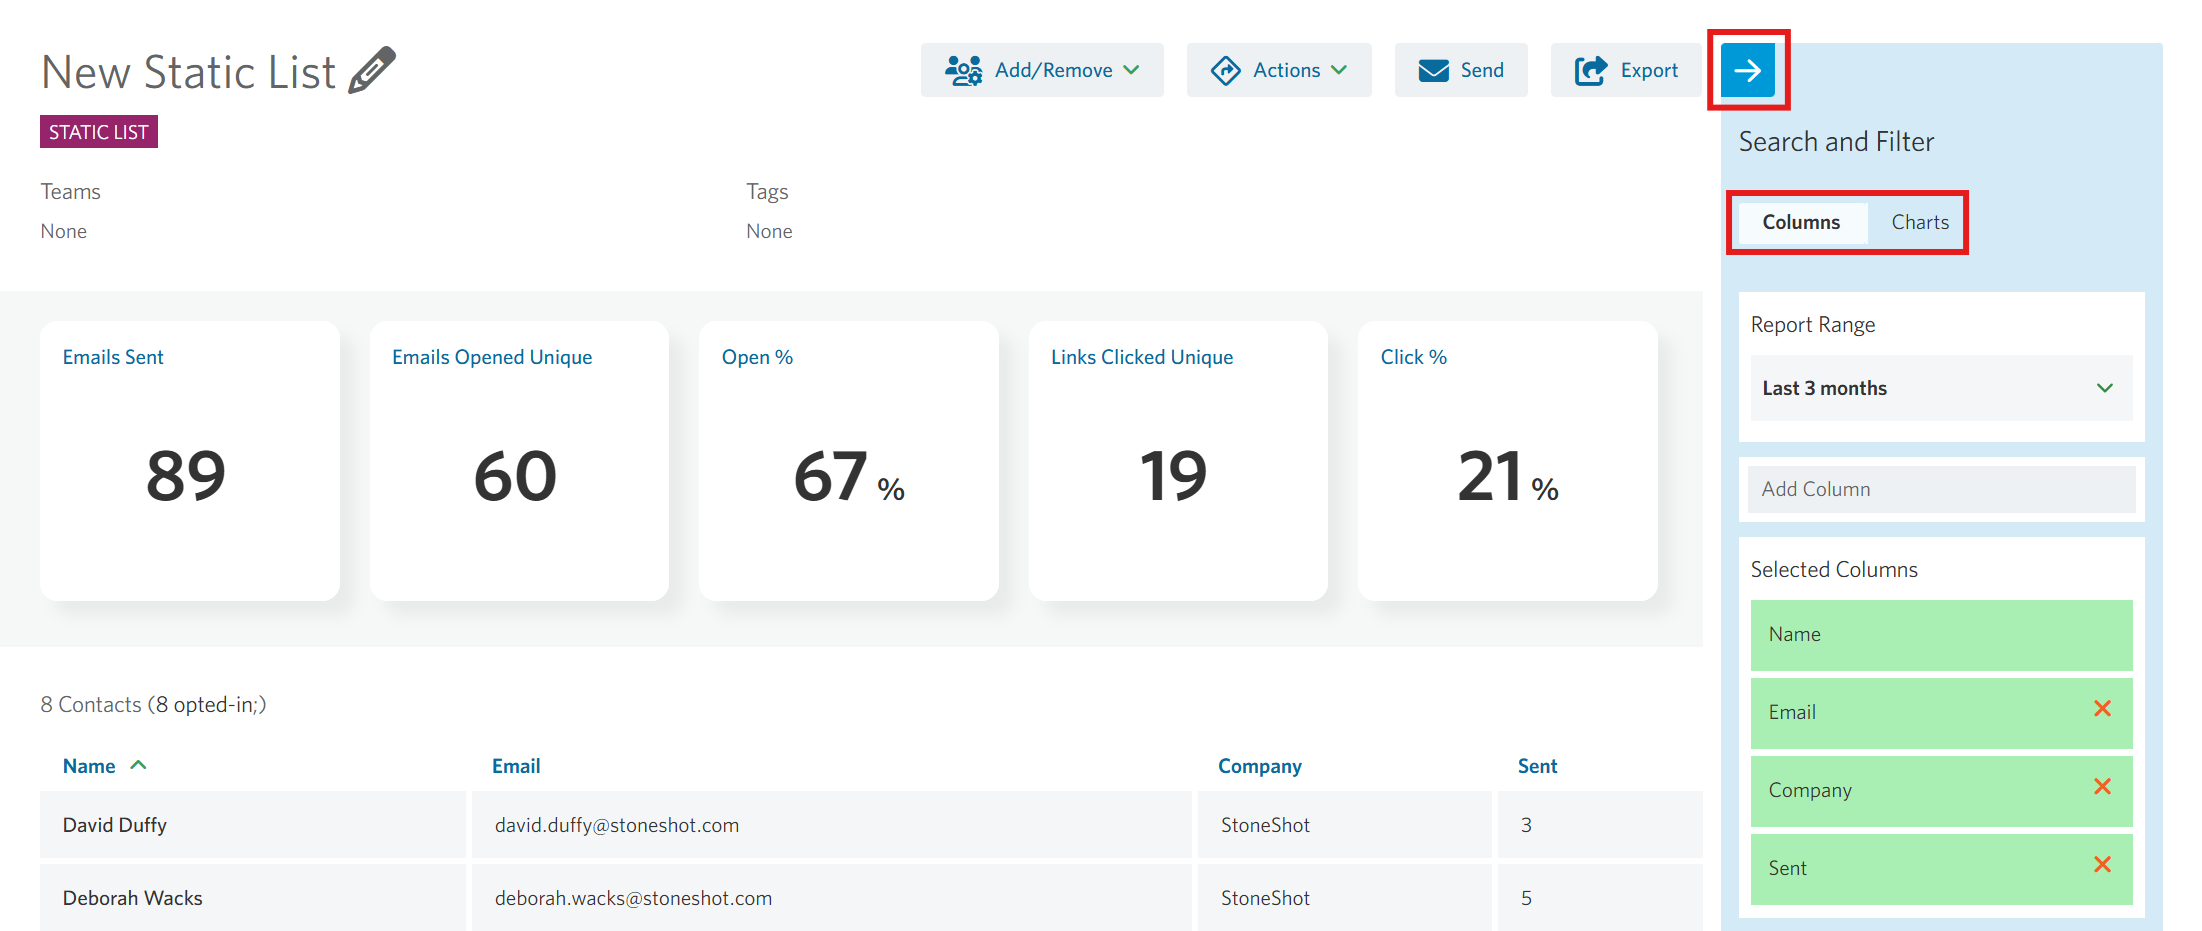
Your contacts are now added to the list and you’ll see them appear at the bottom of the screen.
You’re able to carry on adding more contacts or to review your list, click on the Close button to view the contacts in your list more easily and view any statistics on the contacts in the list.
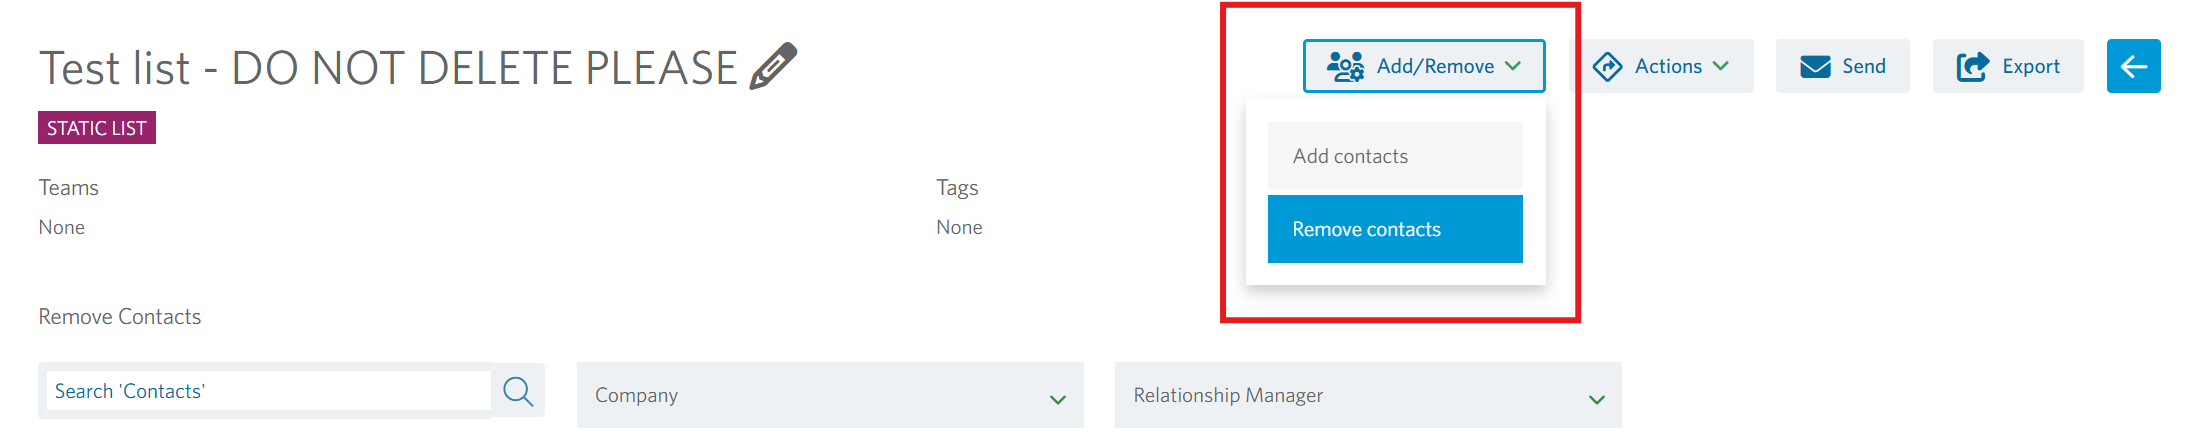
If you need to add or remove contacts, click on the Add/Remove button. If you need to add more contacts, click on Add contacts and follow the process you’ve already followed.
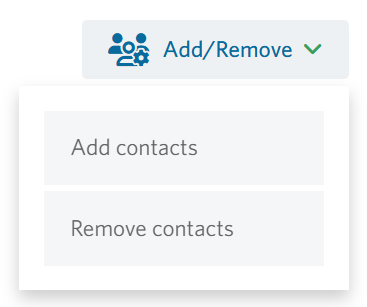
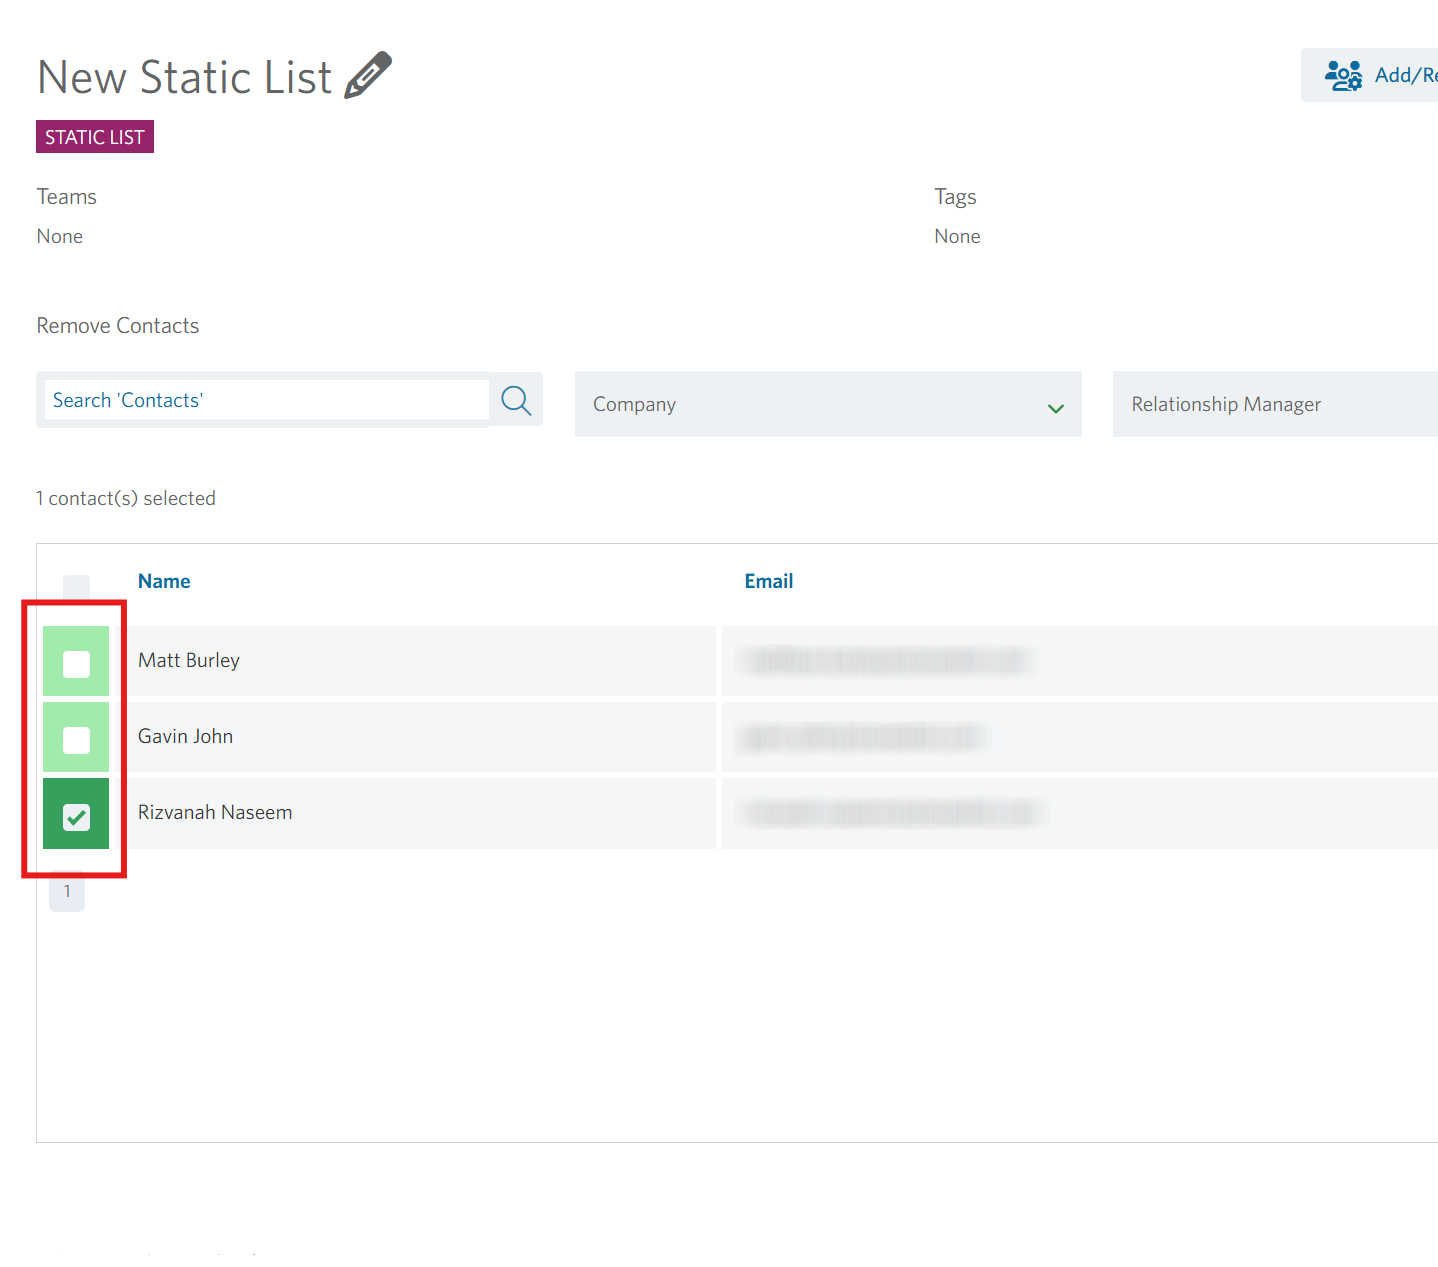
If you need to remove contacts, click on Remove contacts, tick the contacts you wish to remove and click Remove to take them out of the list.
Now you have assigned contacts to your list, you’re able to perform some actions on your new list. You’ll be able to pick from Bulk assign contacts, Copy list or Delete list. First is the Bulk assign contacts tool. This allows you to set all of the contacts in your list to a specific option in your account such as setting them all to ‘Subscribe’ for a particular Email Preference or setting them to have the same Relationship Manager. To do this, click on the Actions button and select Bulk assign contacts.
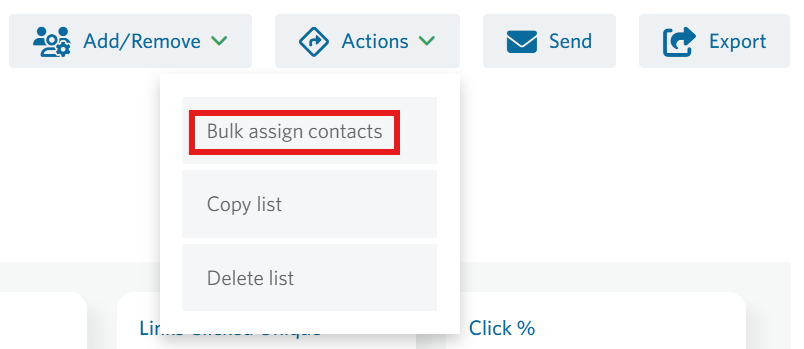
You’ll see the Bulk Assign section appear. Firstly, select an option from the dropdown which are:
- Opt In Status – Set the entire list of contacts to unsubscribe or subscribe for all mailings
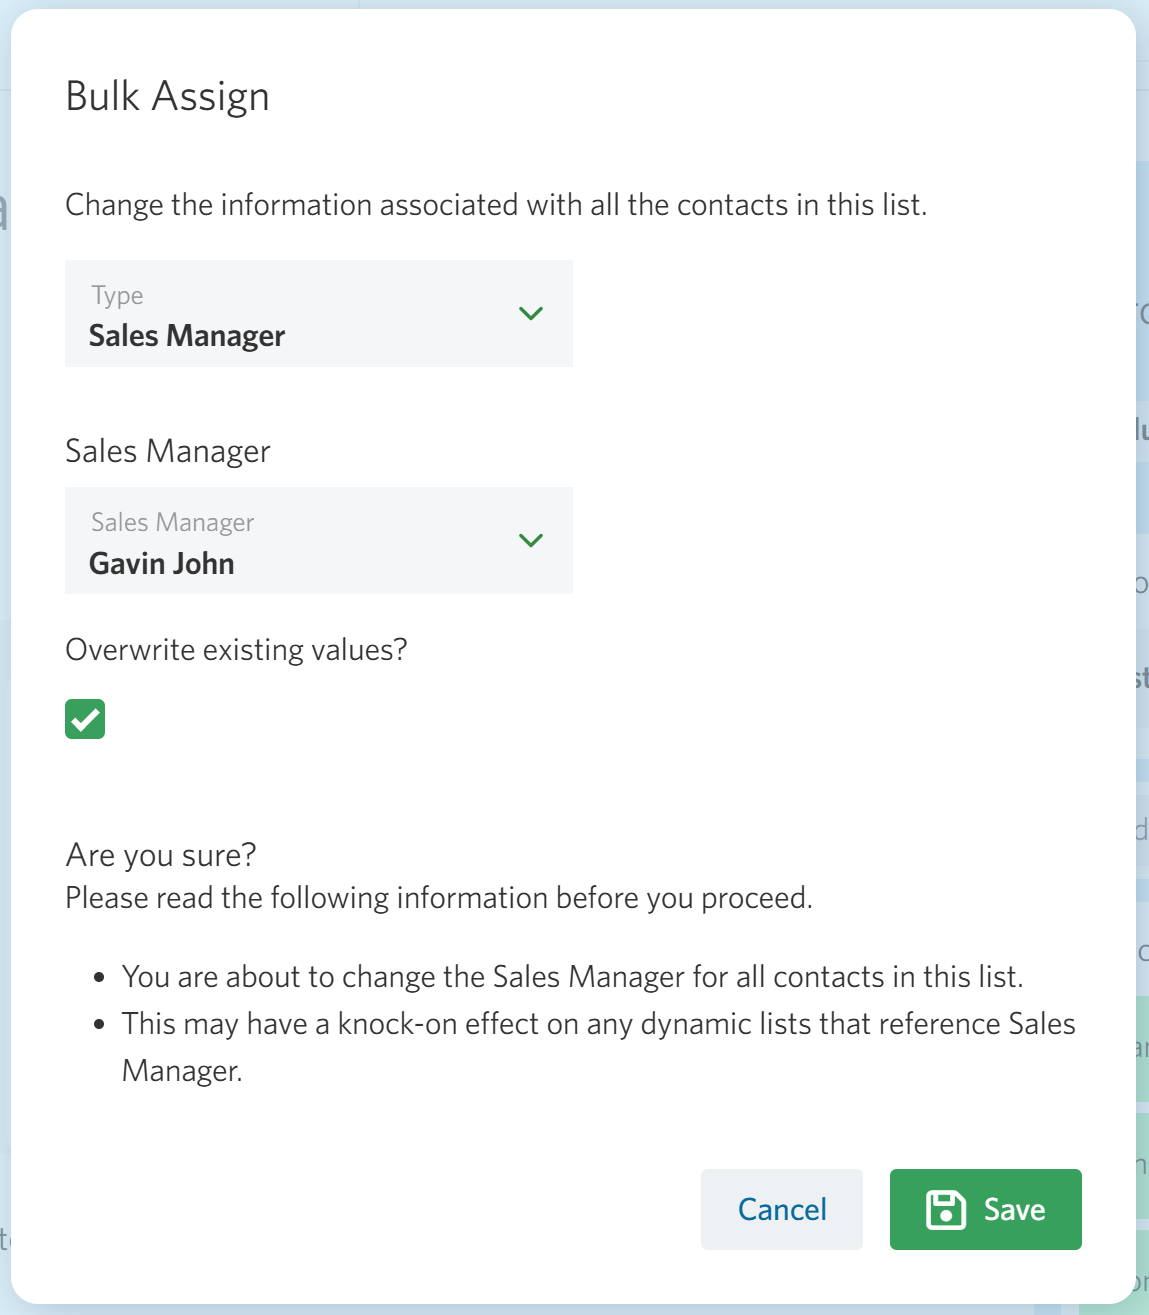
- Sales Manager – Set the entire list of contacts to a specific Sales Manager
- Segmentation – Set the entire list of contacts to a certain segment
- Salutation – Set the entire list of contacts to populate their Salutation (or Custom1) field
- Event Status – Set the entire list of contacts to a status against a session such as Invited, Attended etc.
- Document Subscription – Set the entire list of contacts to subscribe or unsubscribe from a particular document. This can only be used if you have the Document Distribution Solution (DDS).
- Content Tag – Set the entire list of contacts to be subscribed against a particular content tag. This can only be used if you have the Content Distribution Solution (CDS).

After picking your first option, you’ll be able to pick the value to set all of the contacts in the list to. In this example we’re setting all contacts to have the ‘Sales Manager’ set to ‘Gavin John’. By ticking the Overwrite existing values? checkbox, everyone on the list will be set to ‘Gavin John’. If you only wanted to set contacts on the list who have no one set as a Sales Manager and anyone who already has a Sales Manager is left alone, simply leave the checkbox unticked. This is the same for all actions in the bulk assign section.
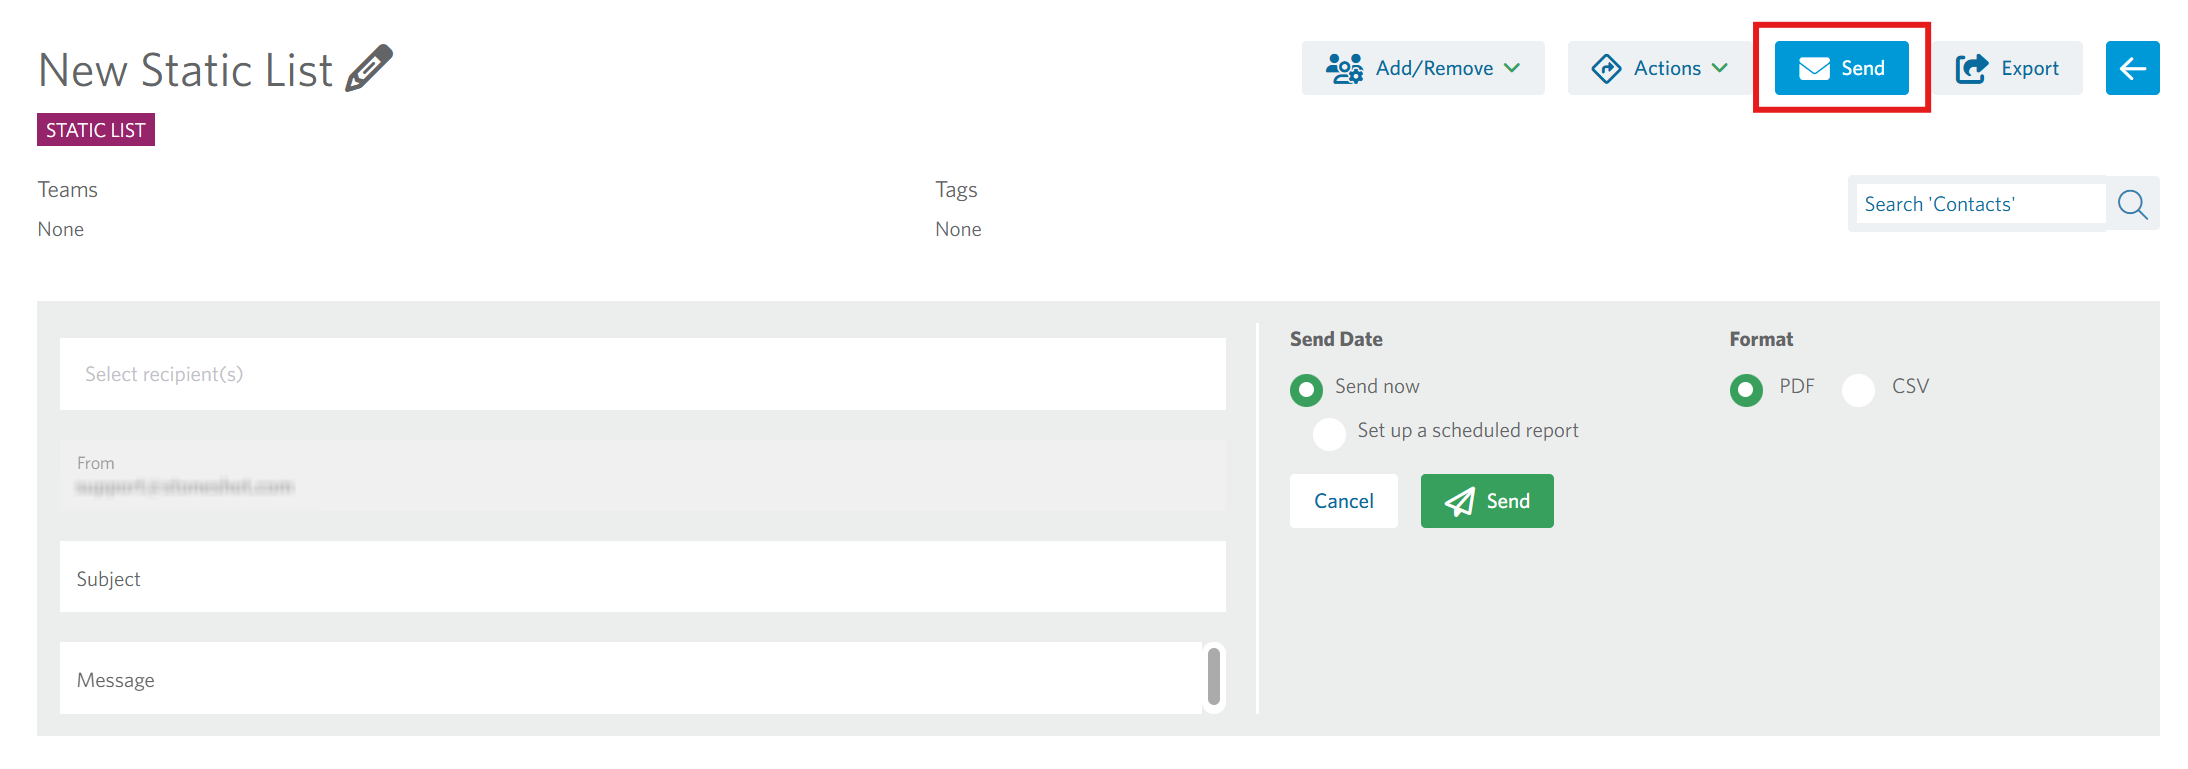
The next action available on your list is the ability to send a report on your list to a colleague. You’re able to choose whether to send the report as a PDF file or as a CSV file. A PDF file will send a snapshot of the list statistics (the charts at the top of your screen). A CSV file will send the list of contacts to the chosen person.
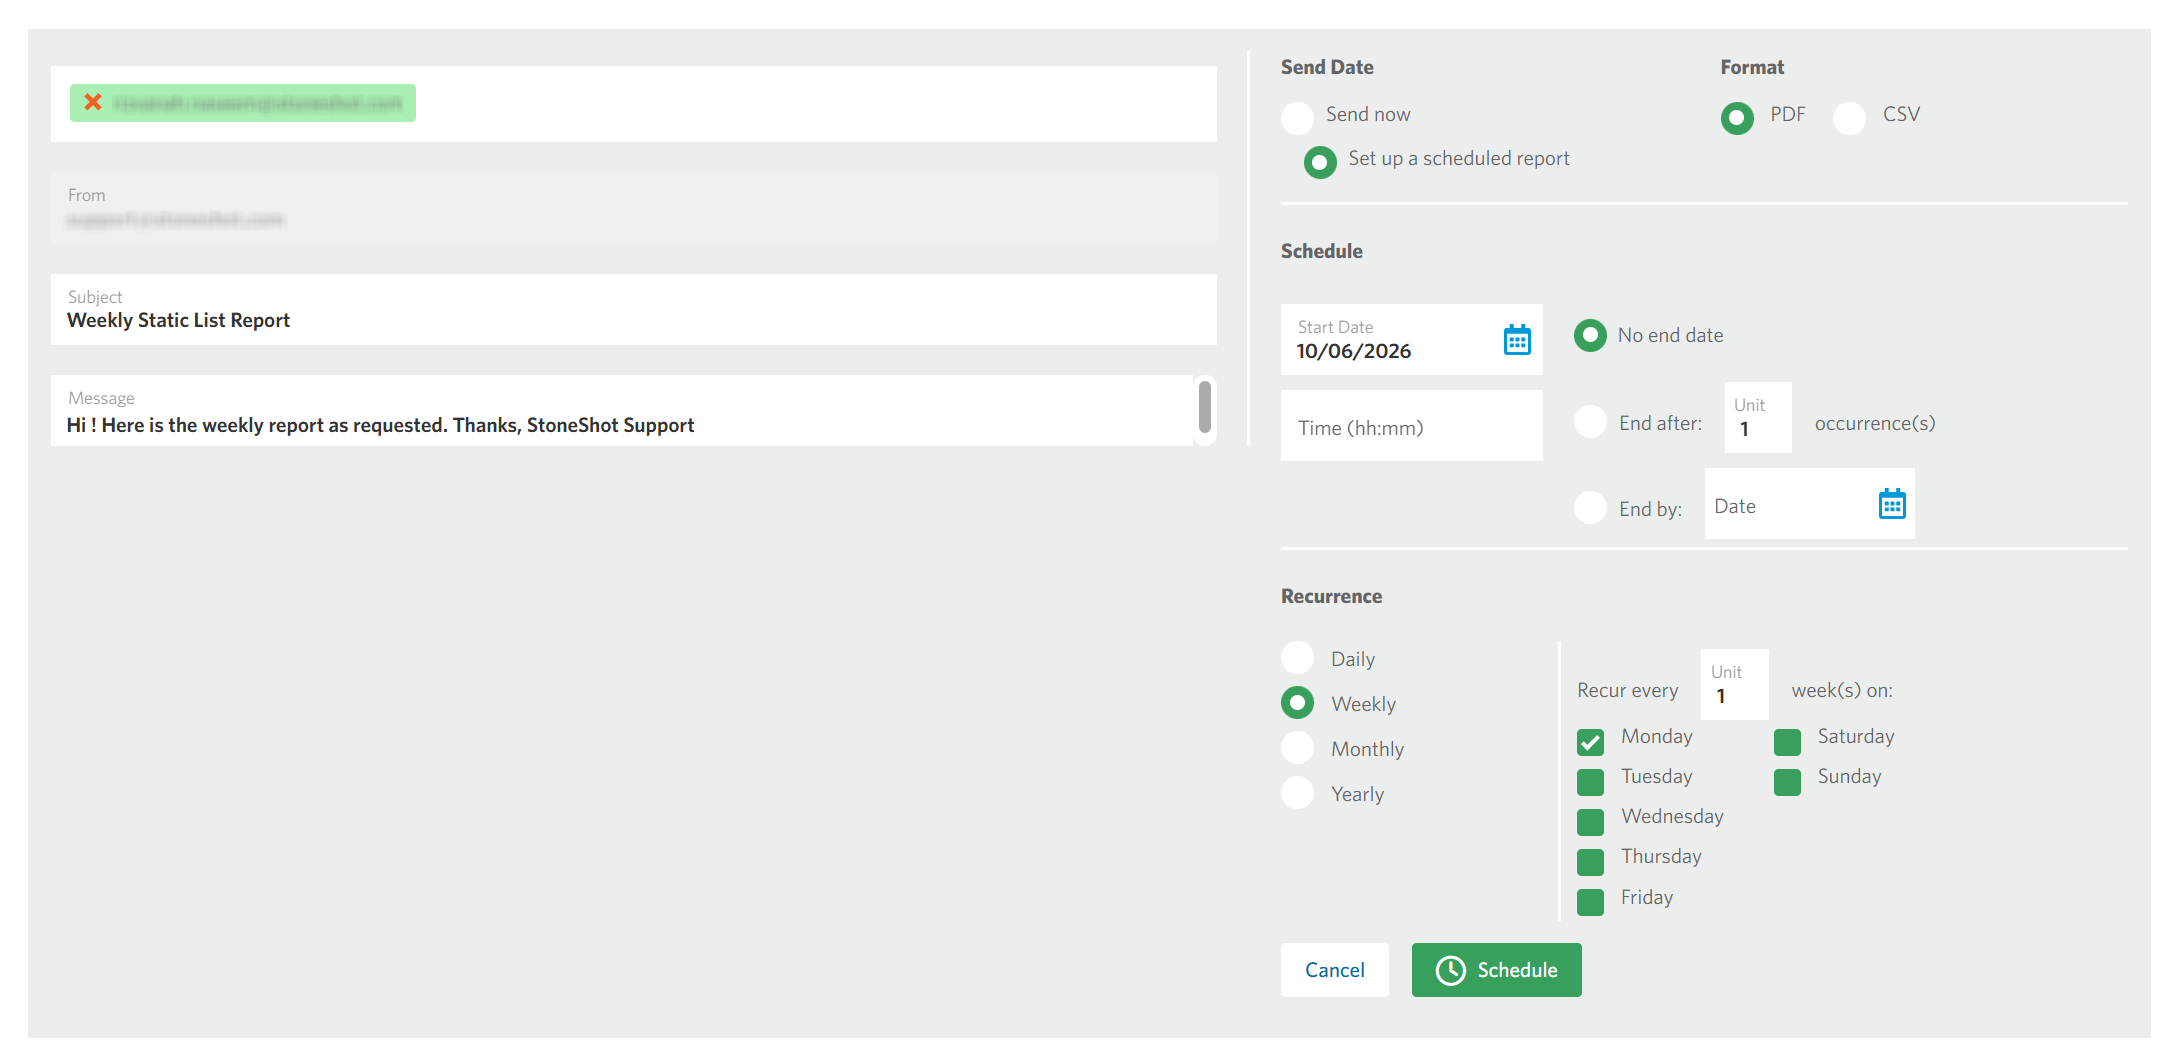
If this is a list that you will update over time, you can tell the StoneShot Platform to send you a PDF or CSV file at a specific time. Select Set up a schedule and fill in the details as you want to receive them. In the below example, a PDF report will be sent out every Monday.
One of the most used functions will no doubt be the Export function. As with the Send function, you’re able to choose between a PDF or a CSV file. A PDF file will send a snapshot of the list statistics (the charts at the top of your screen). A CSV file will download a copy of the contacts for you to open in Excel.
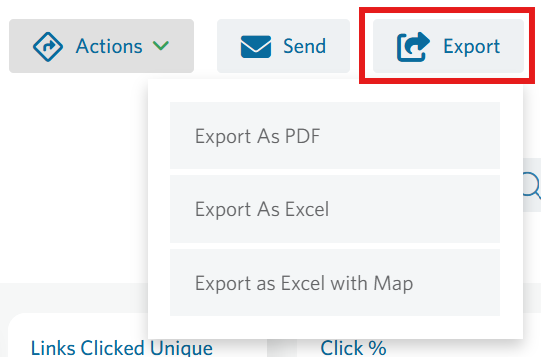
If you would like different statistics at the top of your list or need more information on each contact, you can add more options by clicking on the Edit button. This pops open the edit panel and allows you to build up information on your list. The Charts and Columns you select here are remembered and used when using the Send and Export functions as described above.
Dynamic lists
When you’ve logged into the StoneShot Platform, head to Contacts > Lists and click on the New List button. From the dropdown, select Dynamic.
You’ve now created the basis for your new dynamic list! As we’ve used a default name, you might want to edit the name to make it more useful. Click on the Edit pencil on the top left and you’ll be able to edit the name of your list, set any Teams against the list that should have access, and Tag the list if that is require.
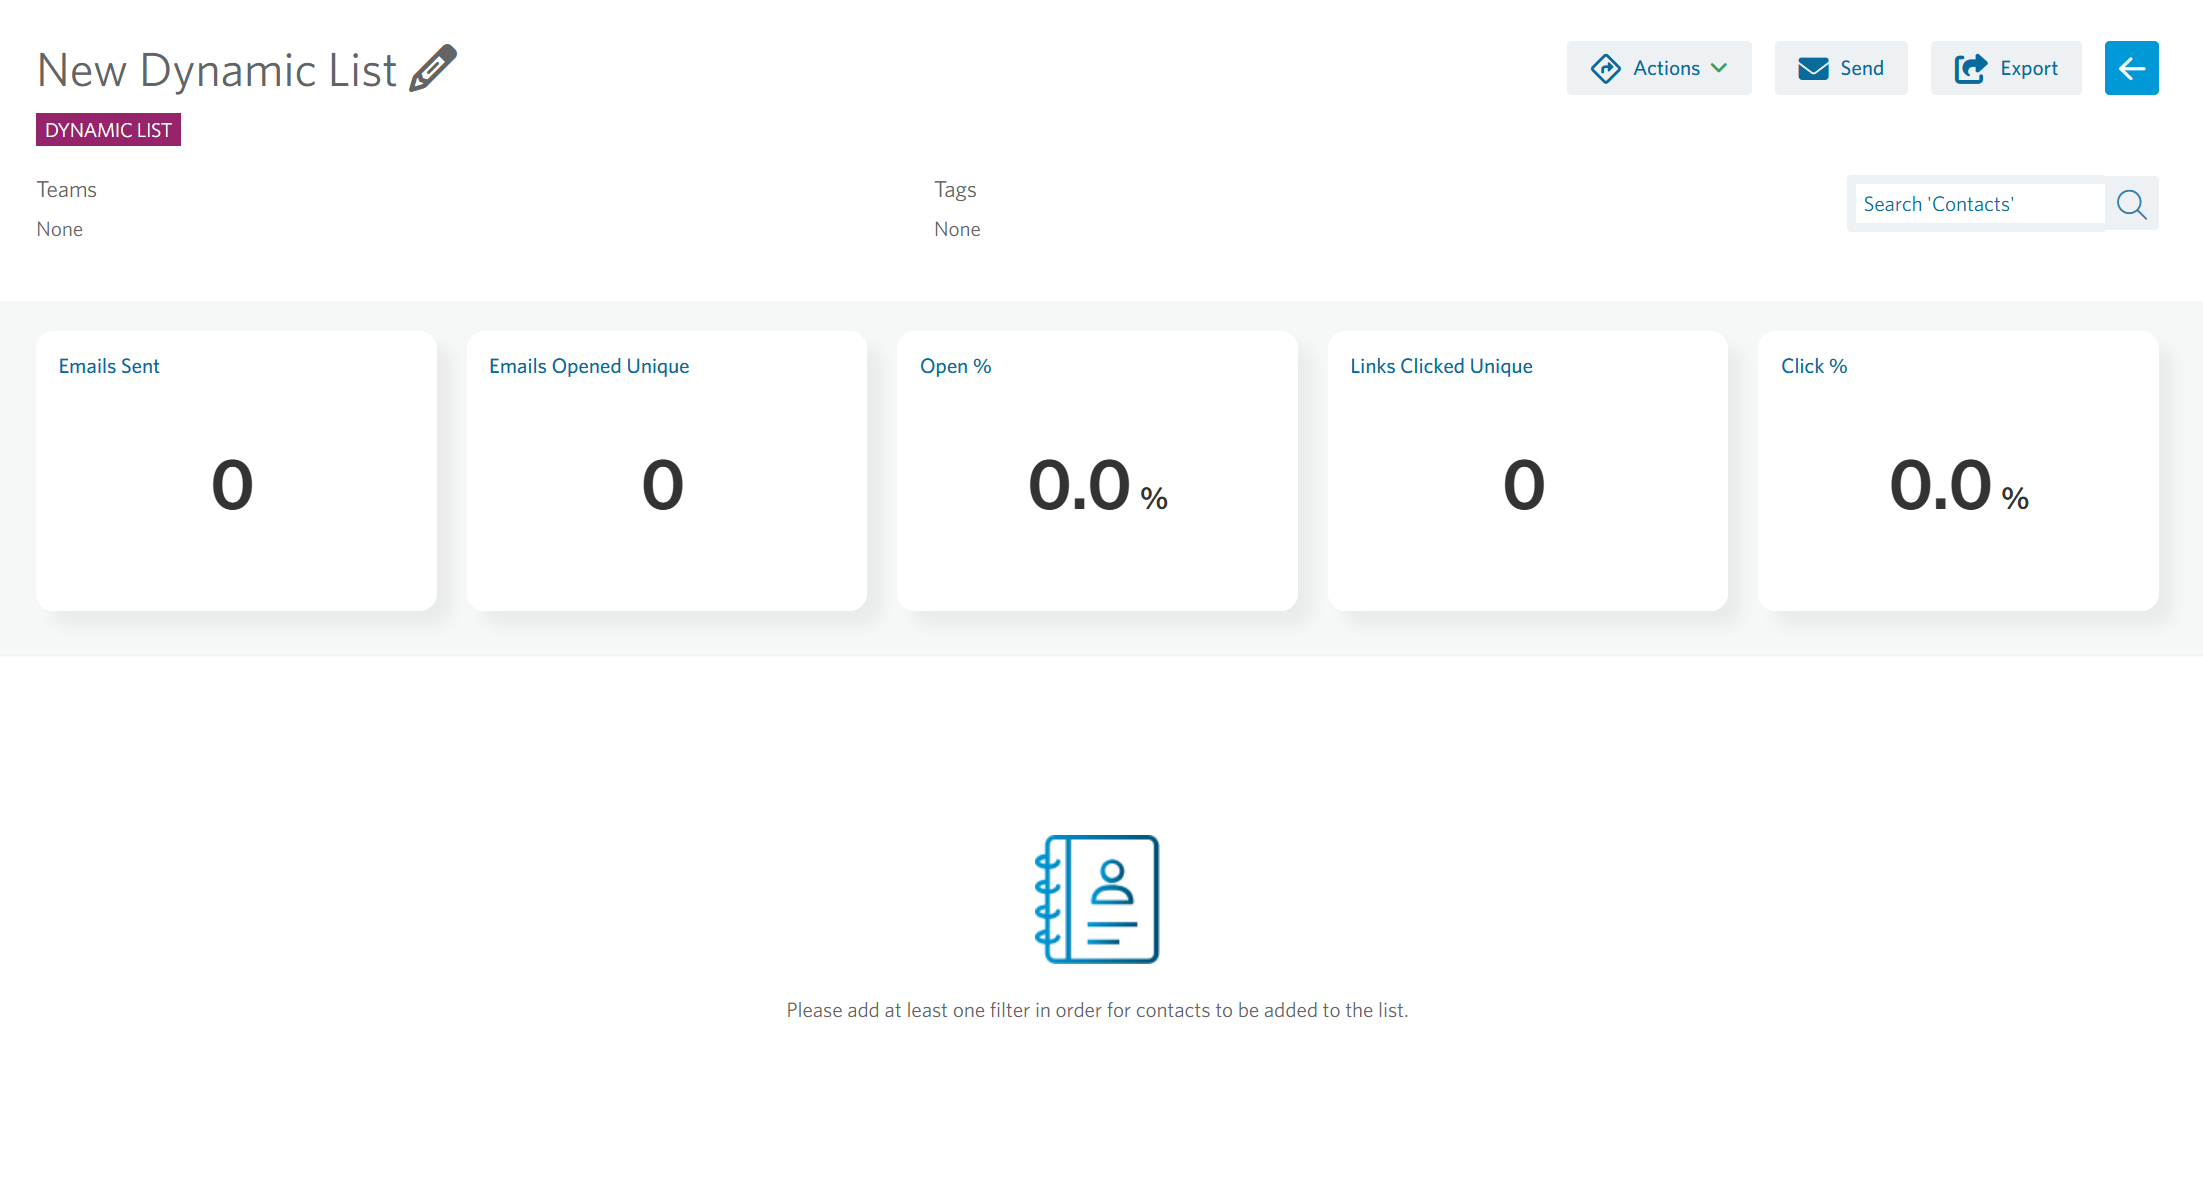
You’ll see a difference on the screen compared to when you create a static list. Instead of manually adding or removing contacts, you define the criteria that contacts must meet to be included in the list. The list is then populated automatically based on those conditions.
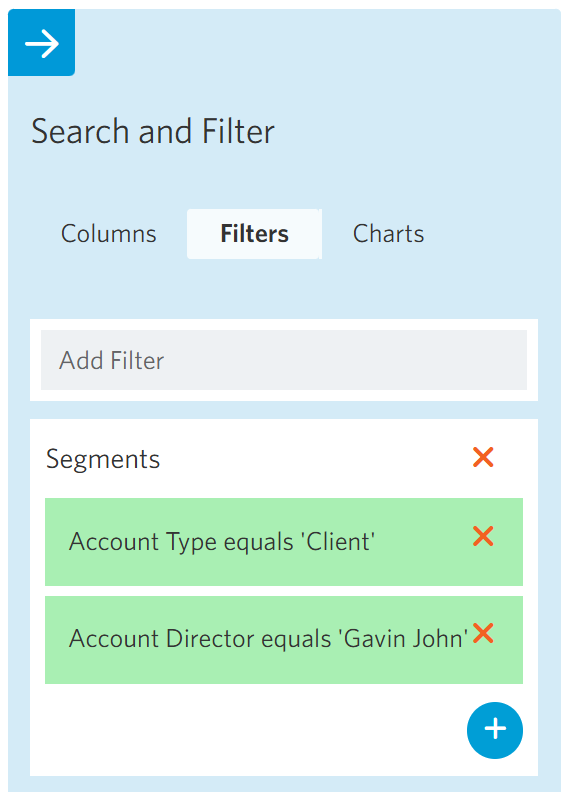
Click on the Edit button and you’ll see the familiar edit panel appear on the right-hand side. You’ll see Columns, Charts and a new one which is Filters. Filters is where you can set the criteria for contacts to be able to be part of the list. Click on Add Filter to see the various options available to you.
In the example below, we’ve chosen two separate segments that all contacts must have to be part of the list: Account Type equals ‘Client’ and Account Director equals ‘Gavin John’. Any contacts not matching the criteria are not included in the Dynamic list. The list is ready to be used in an email campaign and will change as people meet/don’t meet the criteria set.
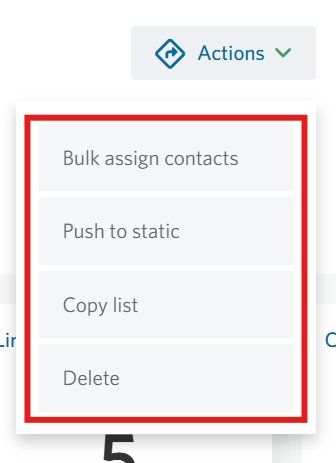
Once you’ve picked your initial criteria, you’re able to set a few different options in the Actions button. You’ll be able to pick from Bulk assign contacts, Push to static, Copy list or Delete.
Bulk assign contacts is explained above within Static lists and works in the same way here.
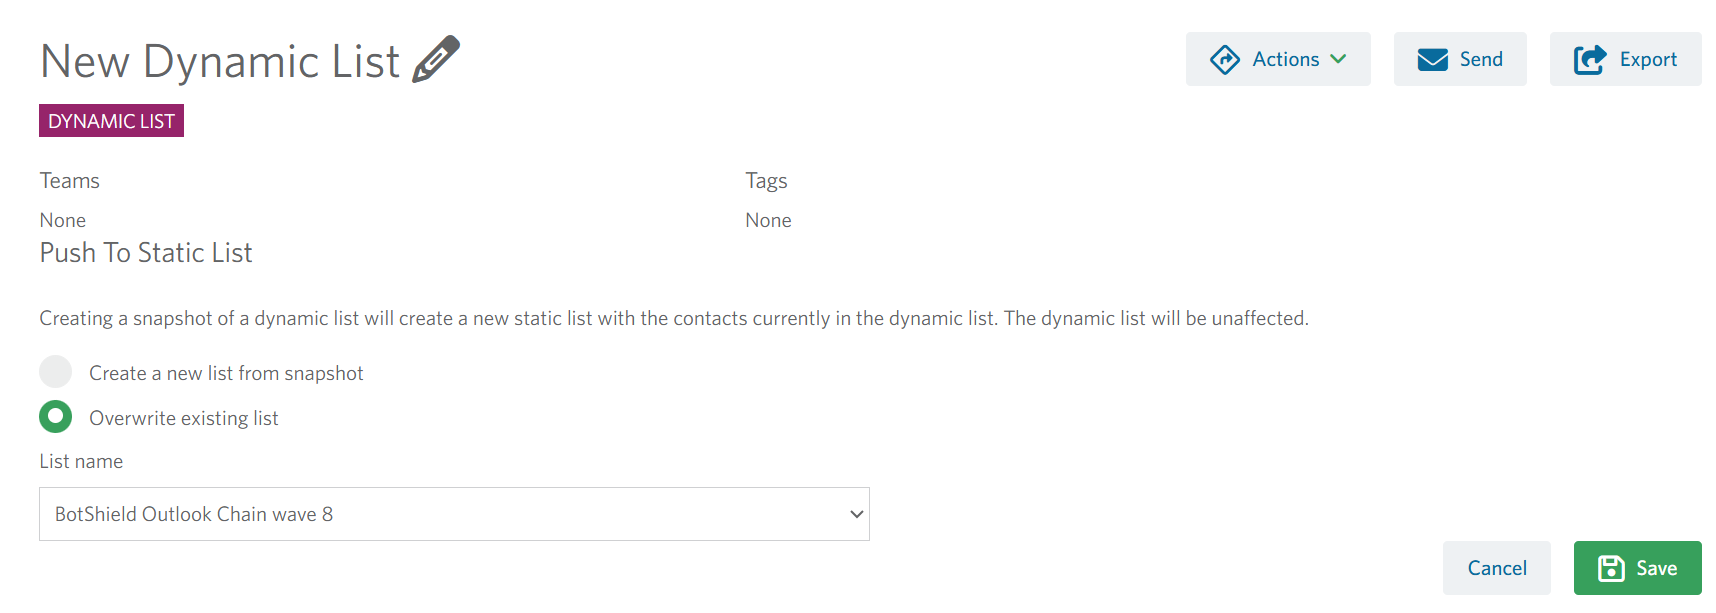
The Push to Static List option allows you to create a static snapshot of your dynamic list.
You can choose to:
- Create a new list from snapshot – Creates a new static list containing all contacts currently included in the dynamic list.
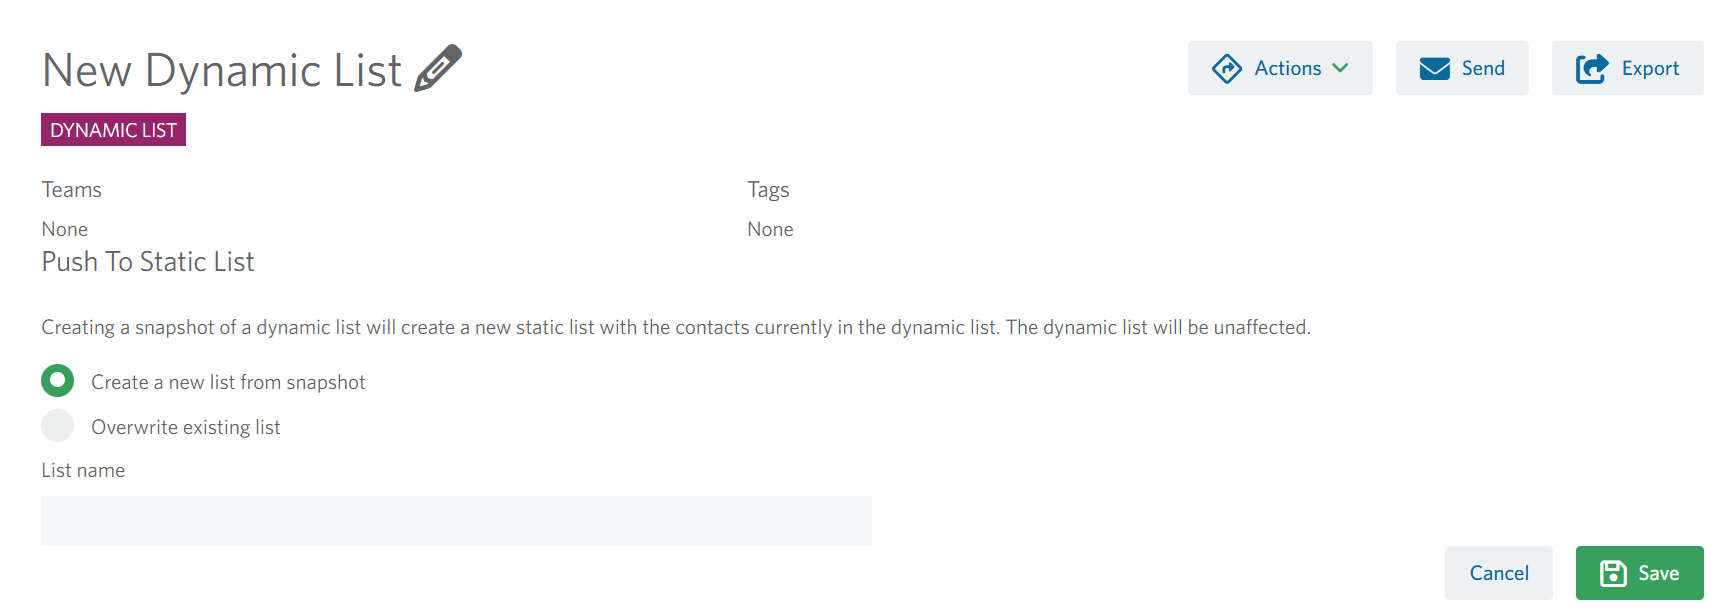
- Overwrite existing list – Replaces all contacts in an existing static list with the contacts currently included in the dynamic list.
As with a static list, you’re able to use the Send function You’re able to choose whether to send the report as a PDF file or as a CSV file. A PDF file will send a snapshot of the list statistics (the charts at the top of your screen). A CSV file will send the list of contacts to the chosen person. If this is a list that you will update over time, you can tell the StoneShot Platform to send you a PDF or CSV file at a specific time. Select Set up a schedule and fill in the details as you want to receive them. In the below example, a PDF report will be sent out every Monday.
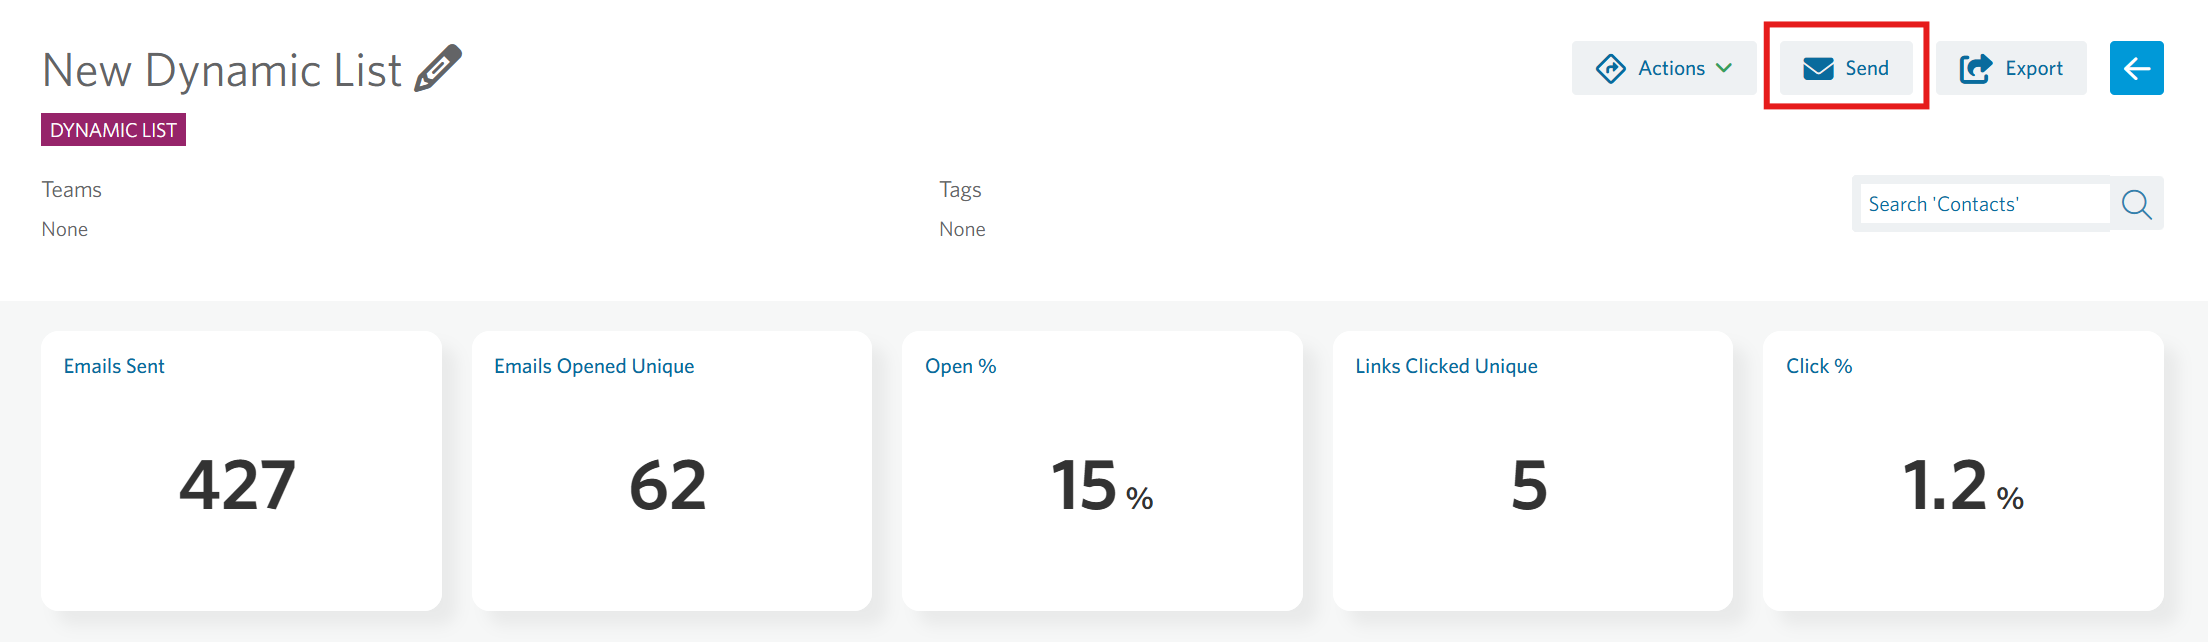
One of the most used functions will no doubt be the Export function. As with the Send function, you’re able to choose between a PDF or a CSV file. A PDF file will send a snapshot of the list statistics (the charts at the top of your screen). A CSV file will download a copy of the contacts for you to open in Excel.
Suppression list
Suppression list is an optional addition you may wish to include when you are planning to launch an email. The suppression list contains contacts who are not opted out from all mailings, however you want to suppress them from a particular email or group of emails even though they are on the primary list.
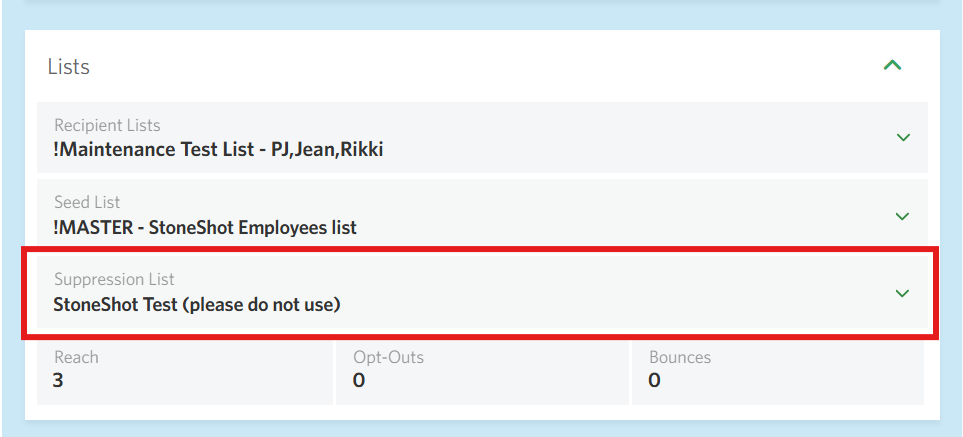
This means you won’t have to search through long spreadsheets to remove them, you can simply maintain or create a new Suppression List which you select on the Lists step when creating your email. These contacts will then be removed for that particular mailing.
Suppression lists are created and managed in exactly the same way as you create your primary mailing list.
They are supported by both A/B split testing and automated mailing features.
Seed list
Similar to Suppression lists, Seeds lists are another optional addition that you can choose to insert on the Lists step when creating your email.
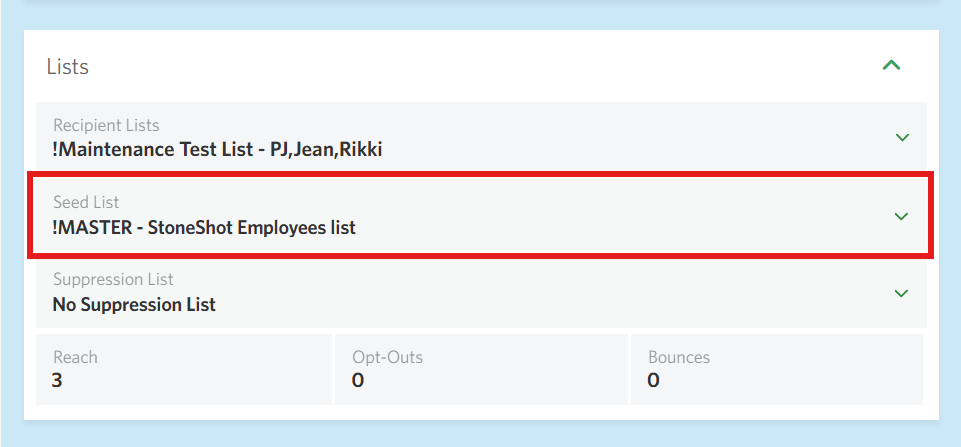
Seeds are internal contacts or stakeholders who want to receive a copy of an email at the same time as the primary contact list but who you don’t want to be included in the statistics generated by the Campaign Report.
This means internal contacts opening or clicking emails will not skew your overall data when it is your contacts’ actions that you want to be monitoring.
If you want to check if a Campaign has been sent to a Seed List, or if contacts have been suppressed using the Suppression List, you simply select the Show more link below your campaign details on the Report page.
Editing a Static list
There are several ways to edit a static list, depending on what type of changes you need to make.
- If you are only adding new contacts, there are two ways to import them into an existing list:
- Option 1 – Import via the Import Manager
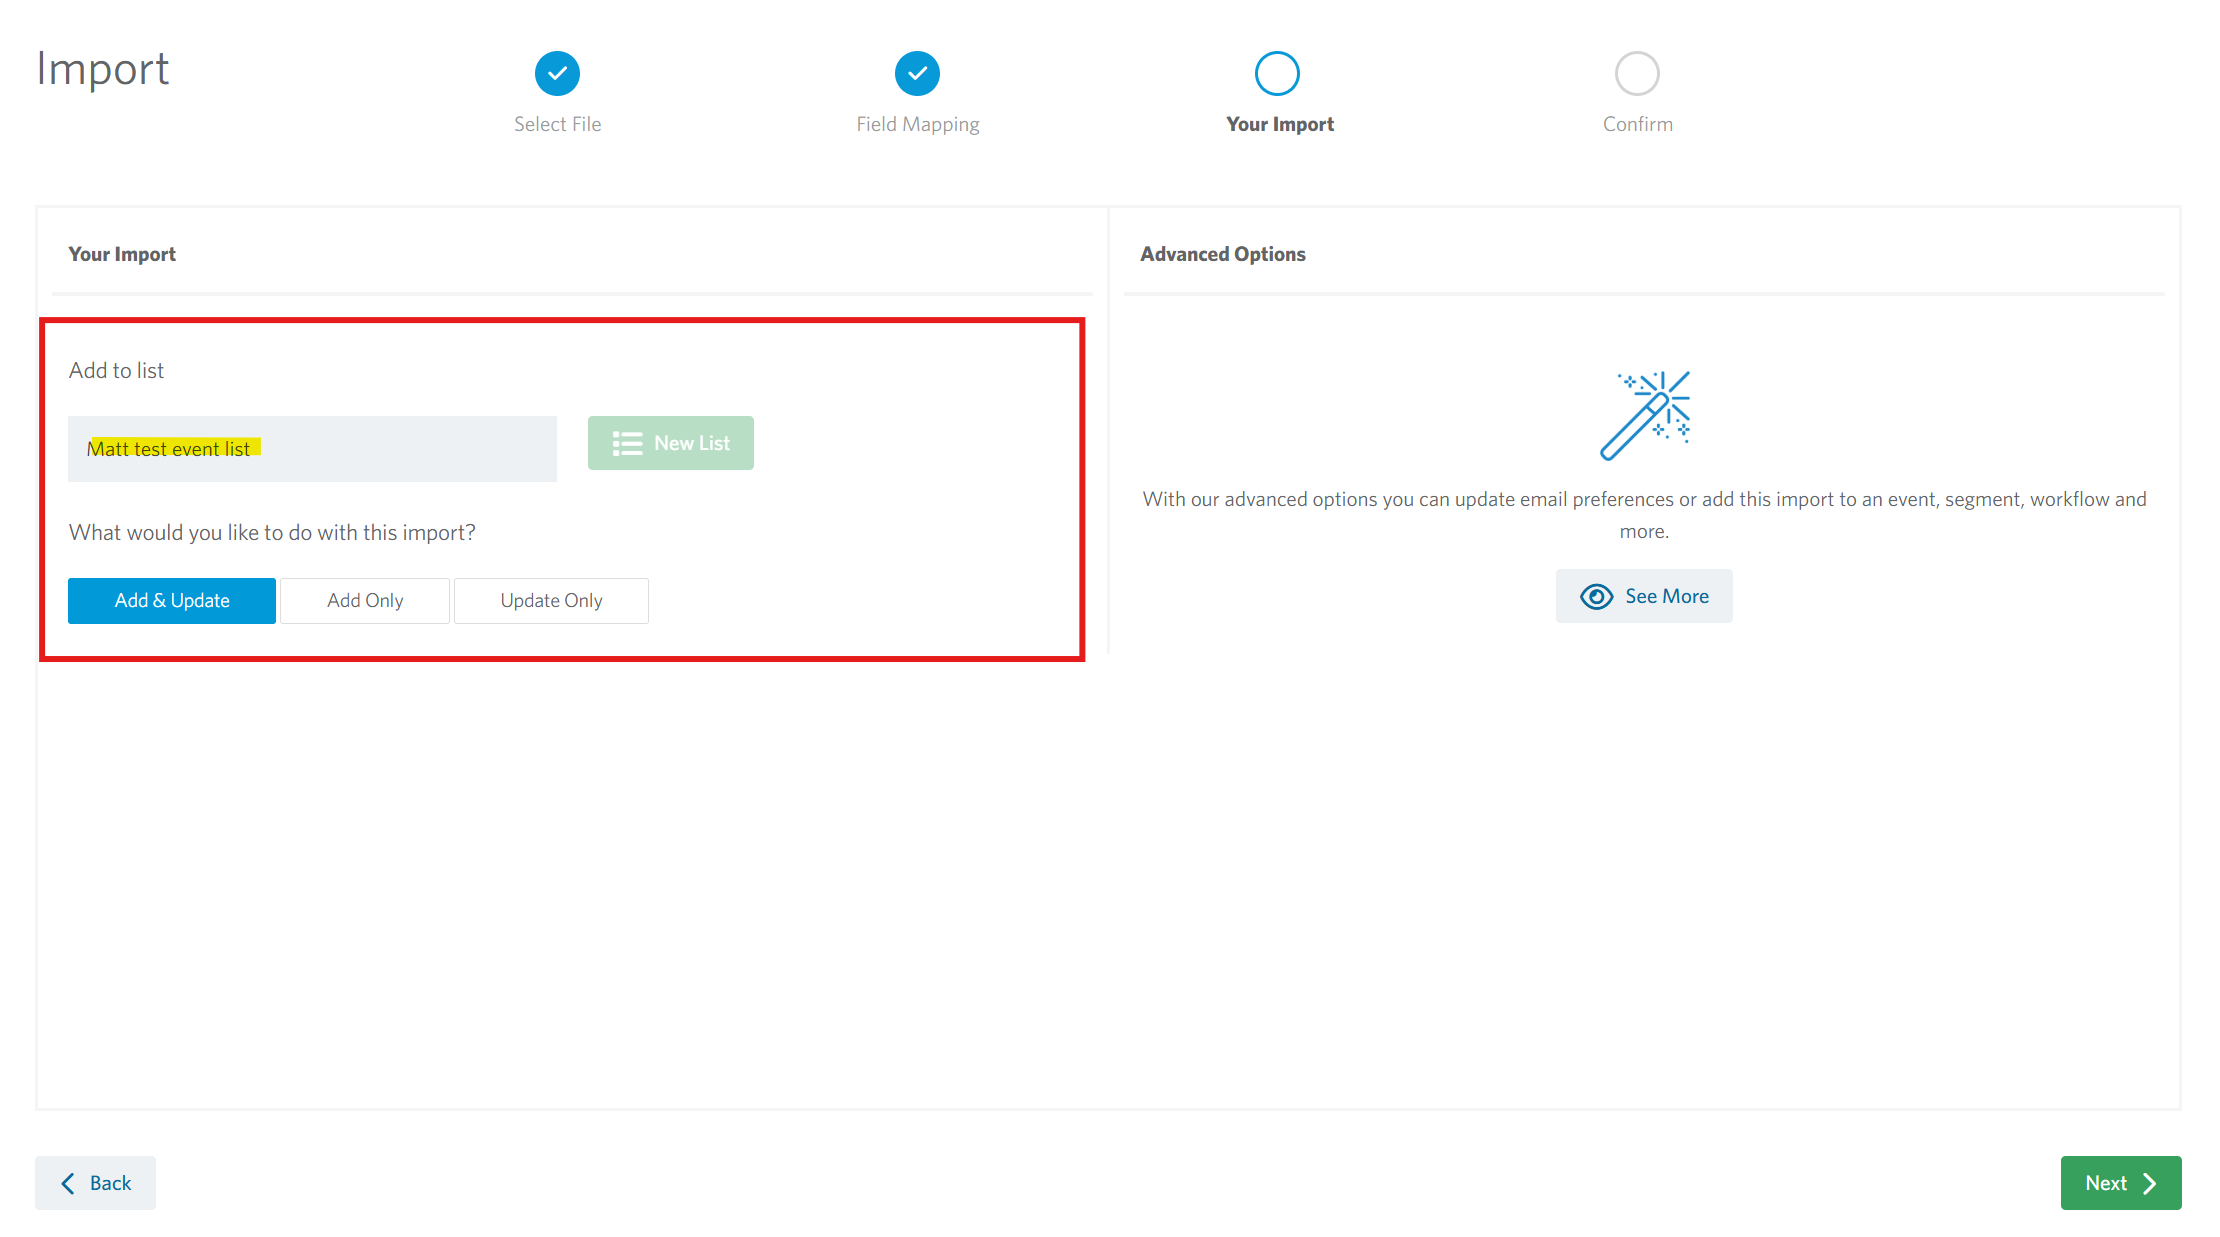
When importing your file through the Import Manager, simply select the existing list you would like the new contacts to be added to.
Option 2 – Import from within the list
Alternatively, navigate to the list and select Add/Remove > Add Contacts > Import New Contacts. When you launch the import from within a list, the list name is automatically populated, ensuring that any imported contacts are added directly to that list.
- Option 1 – Import via the Import Manager
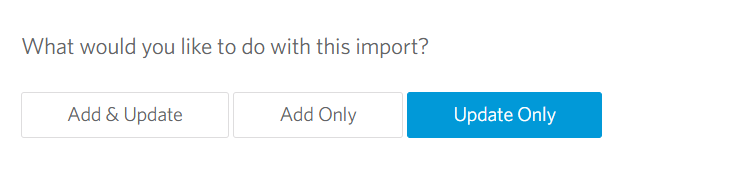
- If you are not adding new contacts, but just editing existing contacts in a list you can import a list using the Update Only mode and make sure you aren’t creating or adding to a list. This will not create a new list but will update these contacts with the new details. Your existing list/lists in the Platform will be updated with these details.
- If you want to change a preference or segment for every contact in a list, you can edit the list using the Bulk assign contacts option. Select your list, click the Actions dropdown option, and make your bulk assign selection. This is available for changing event status, segmentation options, salutation and opt in status. You can choose whether or not to overwrite contacts existing values.
- If you only need to change a few contacts you can manually alter them within their contact accounts, although you obviously will not want to be doing this if you have a lot of contacts to edit.
For more information on how to get started, please contact the StoneShot support team who will be able to help.
Adding people to the test dropdown list
Testing your emails is a vital step to ensure you’re sending the best crafted emails to your contacts.
You can locate the Test tab in the right-hand panel of the Email Builder.
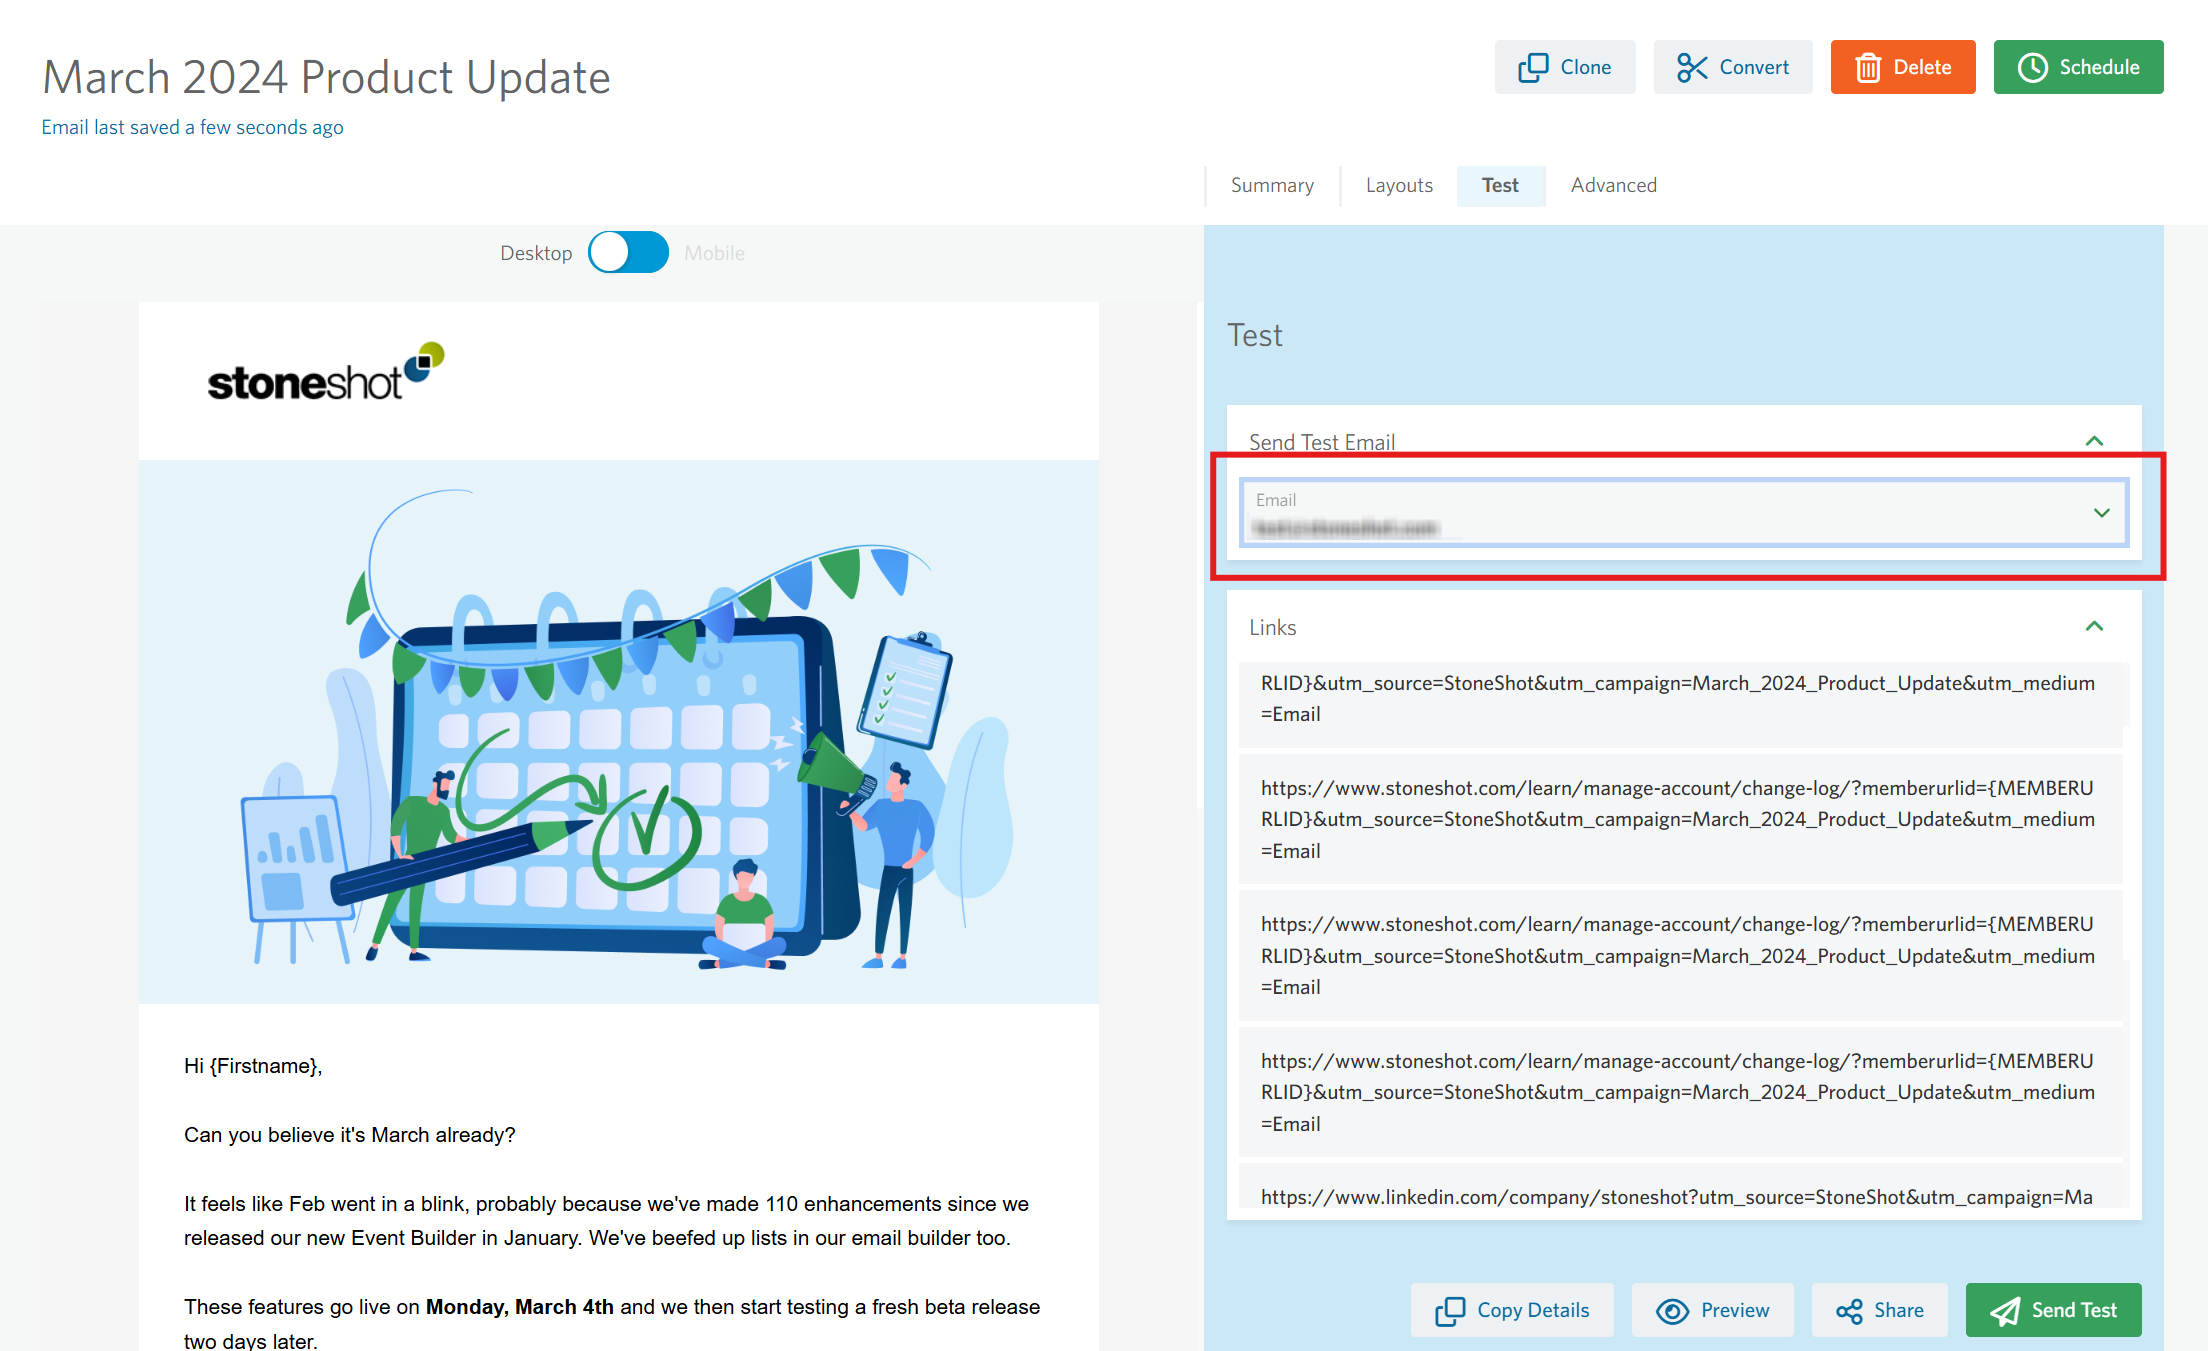
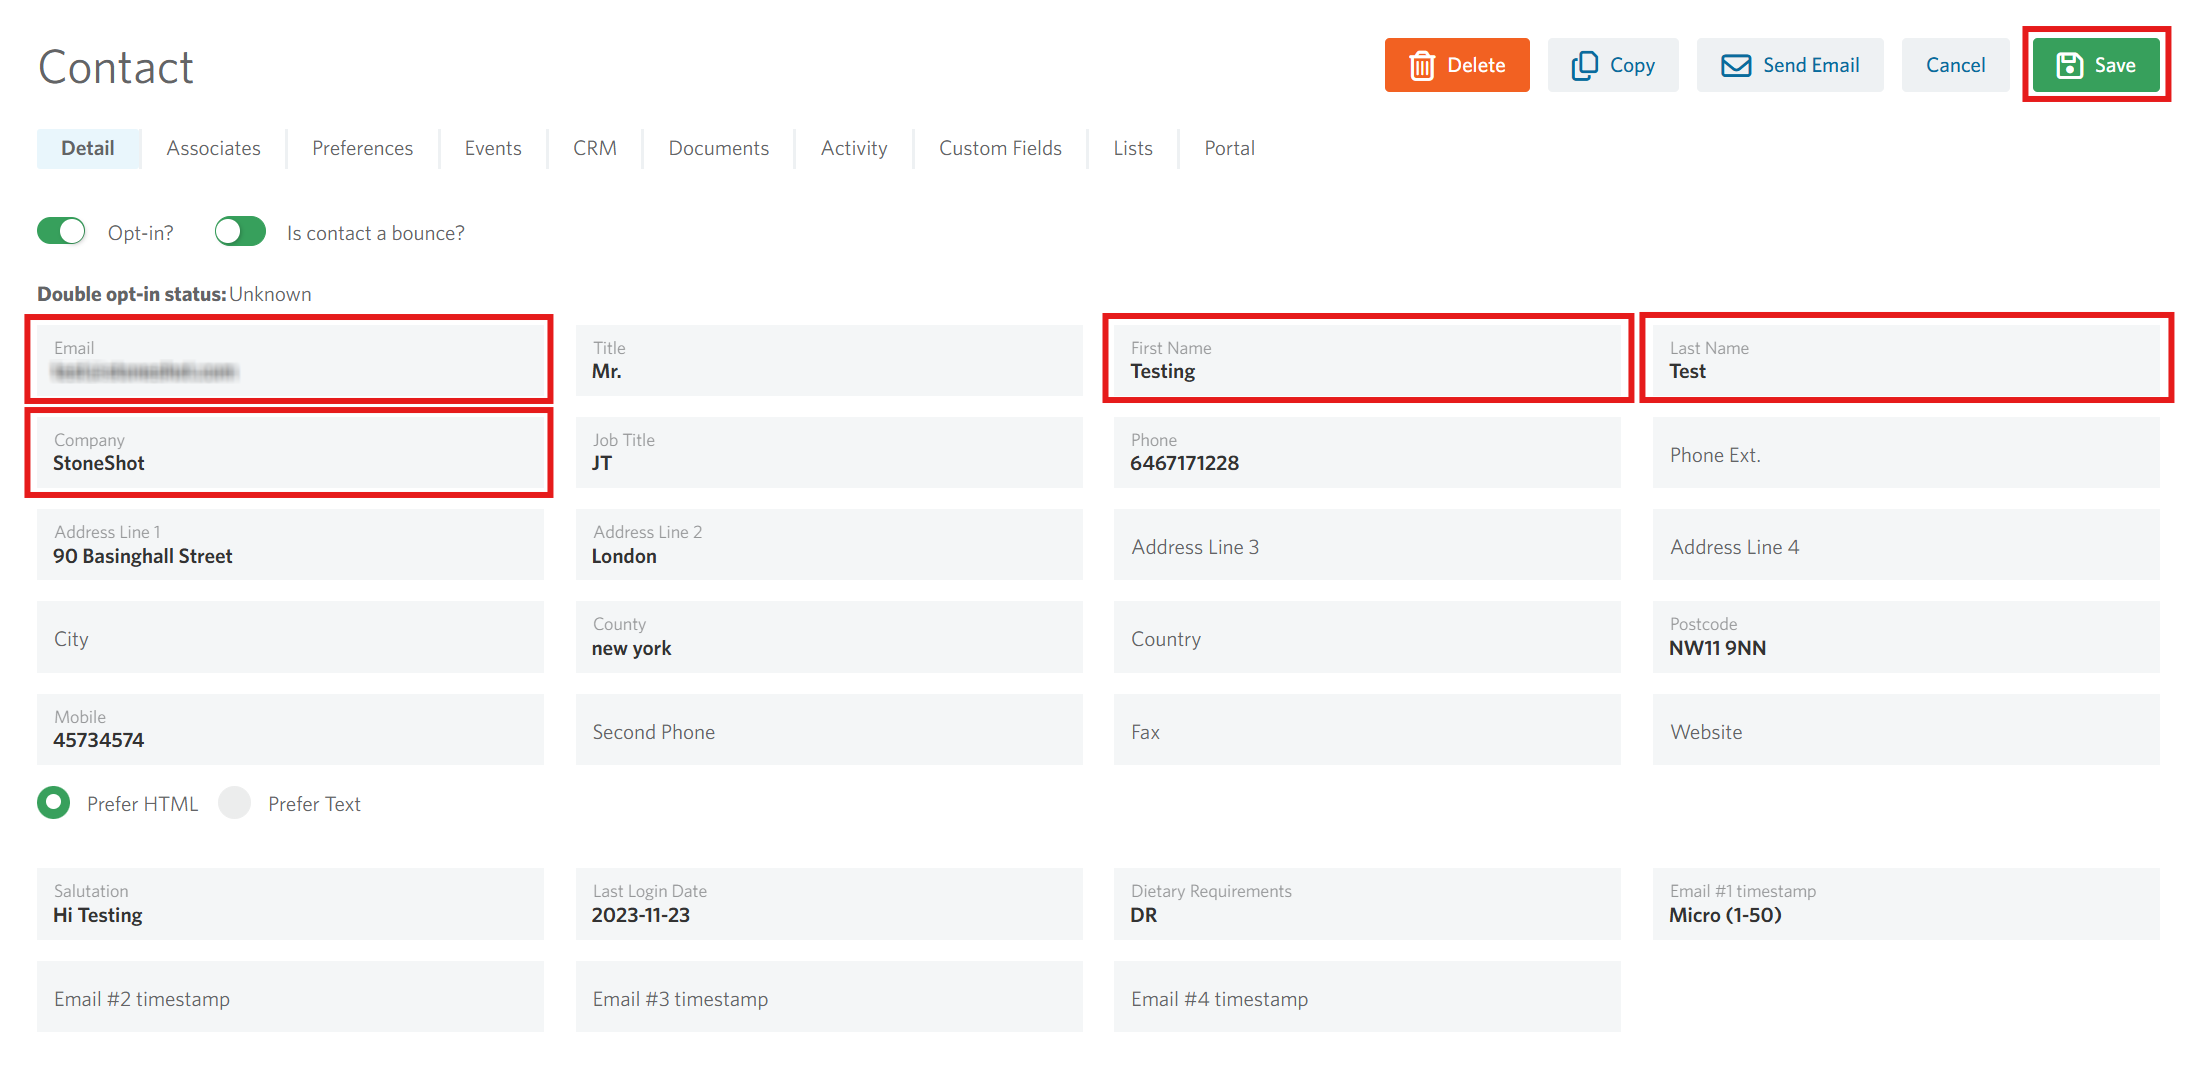
First you would have to check that the individual exists as a contact in the platform.
- To do this click into Contacts > Contacts and search for the email address you’d like to add

- If the contact exists, great. If no, then you will have to create a New Contact

- Fill in the standard details and click Save. Please remember to populate the Salutation field and assign a Sales Manager if you’re dynamically pulling this information into your emails


To find out what list the test dropdown is using, Admin users can check this in the Options > Advanced section of the platform
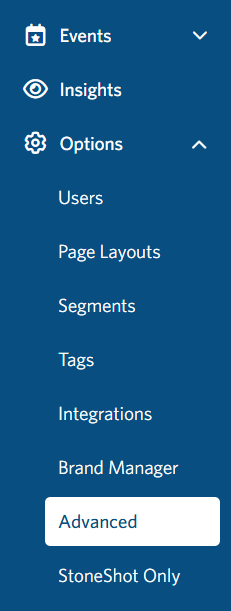
Scroll to the Default Lists section and you’ll be able to view the name of the Test List.

To add emails to the test list:
- Navigate to Contacts > Lists

- Search up the test list (typically named something along the lines of “Test List (Do not Delete)”) and click into it. Click the Add/Remove button in the top right of the page and select Add contacts

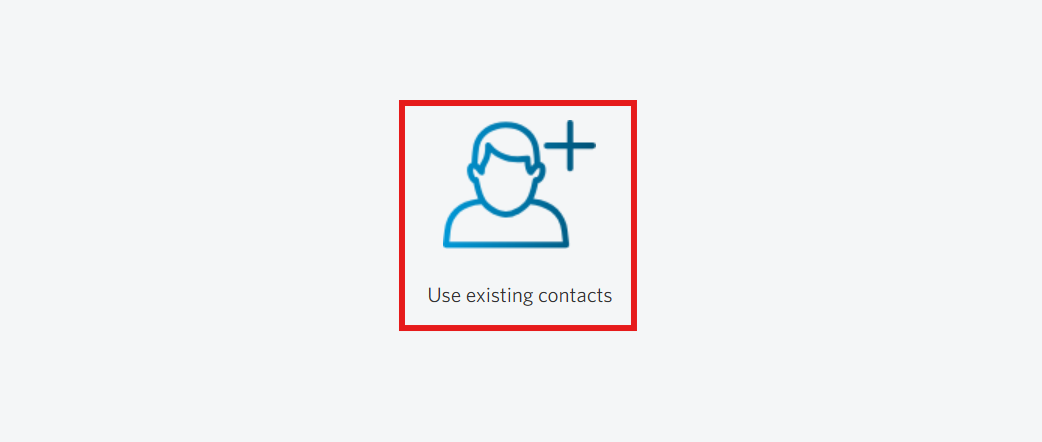
- The select the Use existing contacts option
- Search for the contact, when their record appears tick the box against the name and click the Add button


If the search does not return any results then it means they are already on the test list.
You can use the same steps as above to remove contacts from the test list too, just select the Remove contacts option instead
FAQ
How can I merge lists?
There are a few ways to do this.
- Combine lists in the Email Builder. To send the same email to all lists, simply select each list within the Email Builder. Click on Recipient Lists and you’ll see you can search and select multiple lists.
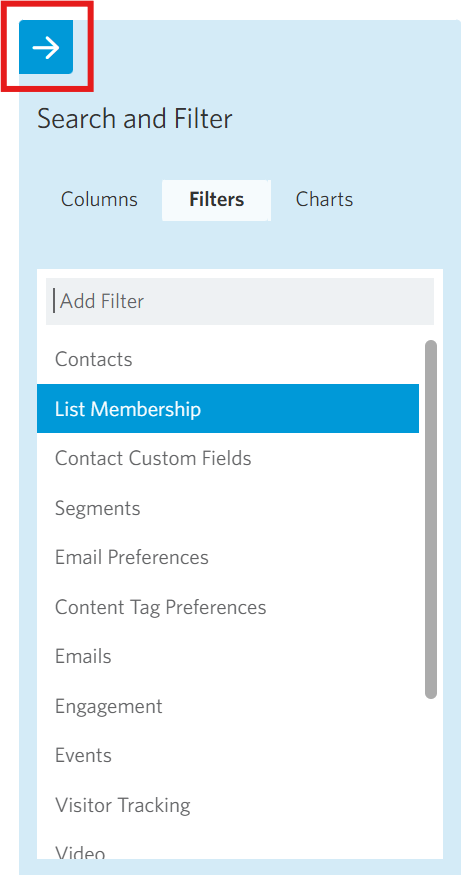
- Join lists with a dynamic list. If you want to combine lists to pool contacts, you can make a dynamic list and select the lists. Go to Lists on the Contacts menu, hit New List and pick Dynamic. Then under Filters on the right, pick List Membership and you’ll see a list of lists. Simply select the lists you want (hold CTRL while clicking) and hit Apply.
- Make a static list. If you want to edit the list further after merging, you can follow the steps above and pick “Push to Static” on the Actions button. That will make a static list of contacts and you can now add/remove contacts from the list.
Why is my import still queued?
Every time you import a list it goes into a queue. If your colleagues have multiple imports already running, then they will need to finish before yours can start. The time this takes depends on how many records are being updated but this shouldn’t take long. If you find that your import is still queued after 15 minutes then please get in touch with us at support@stoneshot.com and we’ll see what we can do to push yours along.
Why can't I see my Seed List in the dropdown?
The Recipient List, Seed List and Suppression List dropdowns display the most recently updated lists. If your list is not visible, try opening it in Contacts > Lists and saving it again so that it appears in the results.
Otherwise, the list may not be assigned to the team you belong to. Check that it has been assigned to the correct team and that you have permission to access it.
How does the multi-list functionality handle contacts who share the same email address but have different Sales Managers?
If the same email address appears in multiple recipient lists, StoneShot will automatically deduplicate the contact so that only one copy of the email is sent.
If the contacts have different Sales Manager assignments, the email will use the Sales Manager sign-off associated with the first record that is queued for sending.
Why am I getting the error "Email preferences must have a value of either Subscribe or Unsubscribe" when importing contacts?
When importing email preferences, each preference field must contain either Subscribe or Unsubscribe. Blank values are not currently supported.