


StoneShot Learning > Marketing Automation > Dynamic Sender
Dynamic Sender
Generally, everyone tends to be more inclined to open an email when it comes from someone he or she knows. Considering that most contacts are generated by sales teams it would be great if each of those contacts could somehow be linked to their respective sales partners.
In the StoneShot Marketing Platform this is possible, although in other platforms this could only be achieved by setting up multiple versions of the same email with a different sign offs to each individual sales manager’s list.
Using our dynamic senders you can create one single email that is sent to all of your contacts but is created dynamically. This means that each contact will get the same email content, but crucially will receive it signed off from their respective sales manager.
This cuts down massively on your time as a marketer, meaning you only need to create one email, only get one email approved through compliance, and only launch one email campaign.
Creating segmentation and its segments
So, go to Options > Admin > Segmentation Manager and you will be able to see the list of various segmentation options you have.
Let us start by clicking on New as shown here below.

When creating a new segment, the first two important fields you need to fill in are the Name and the Dynamic System Name as shown below. You might also want to update the Display Order. This will be in what order the newly created segment is displayed on your contact screen. You can ignore the remaining fields on this screen for now.
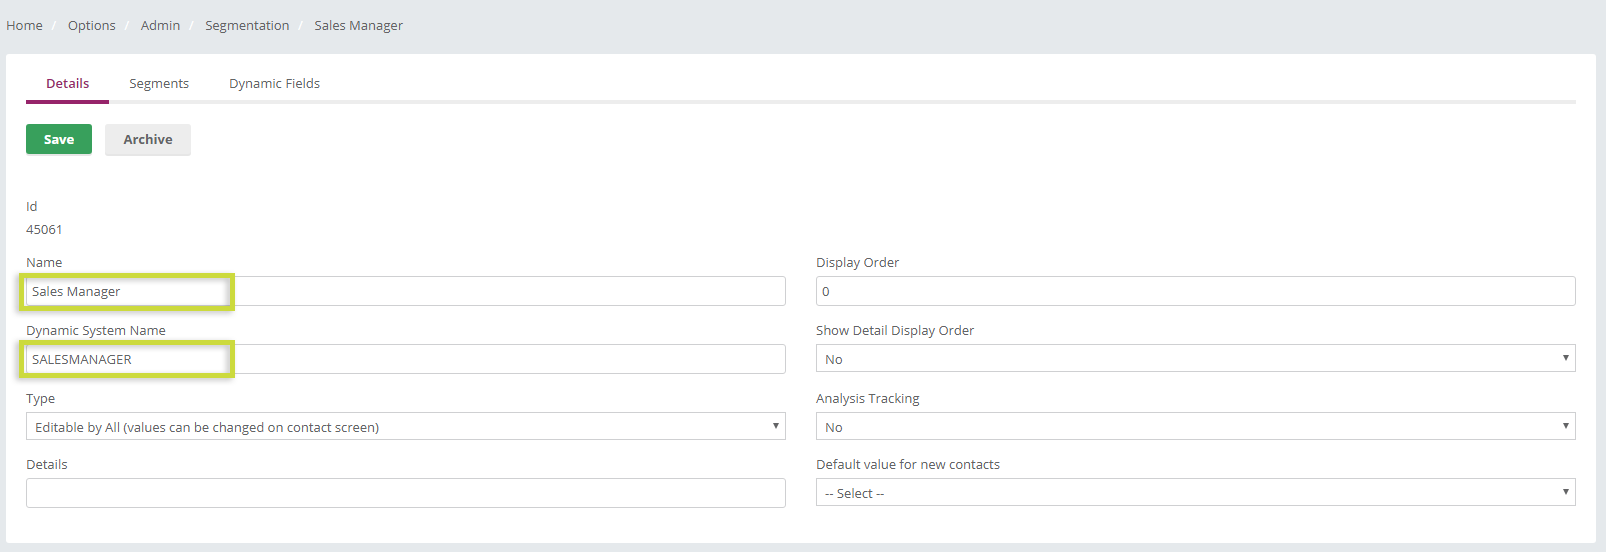
*IMPORTANT: The Dynamic System Name needs to be as one word, in uppercase starting with A-Z and between 2-50 characters.
Once you are done, click Save and then click on the Segments tab. Here we will have a list of all the different options that will be available in the segment. In our case a list of all the Sales Managers.

Click on New and let us start by adding a Sales Manager.
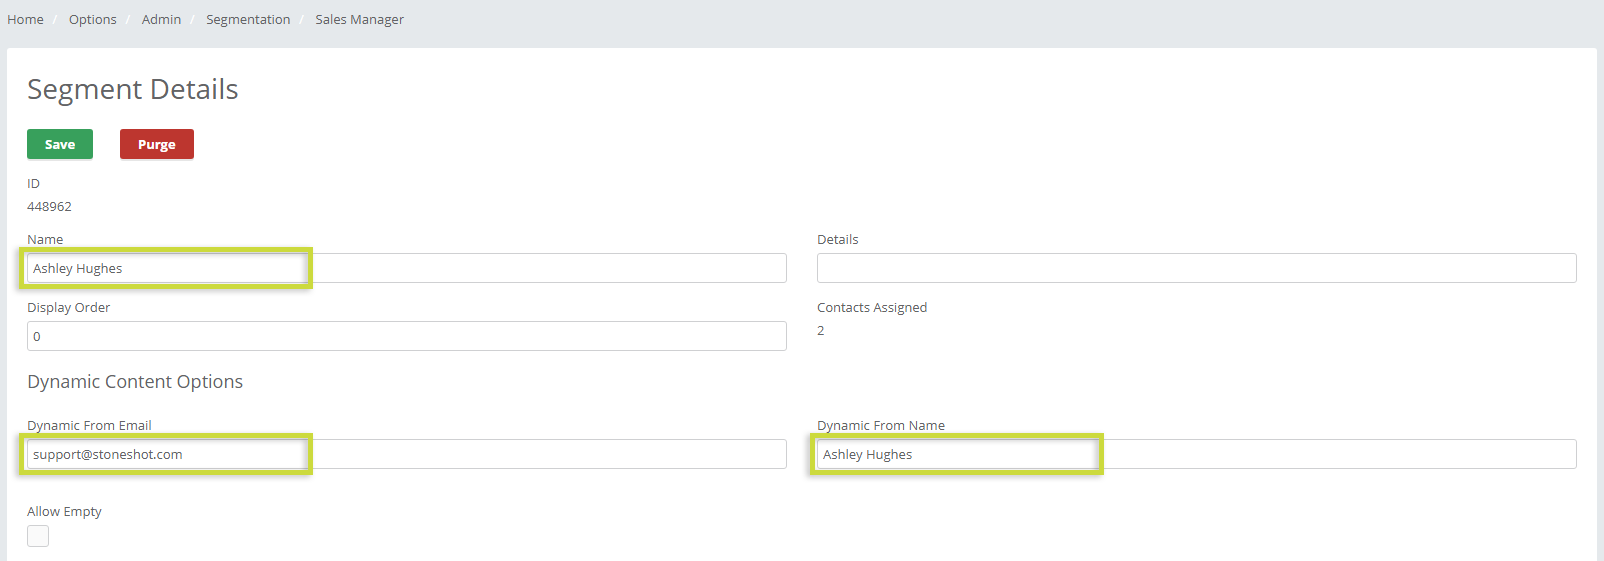
Fill in the Name that will show as a segment, then fill in the Dynamic From Email and Dynamic From Name as shown above. Click Save.
The Dynamic From Email and Dynamic From Name are what will show up as the sender information if the contact is assigned to that particular Sales Manager when they receive the campaign.
Now we can see our first segment has been created. Repeat this for all the options you want in your segmentation, in this example it would be all of the remaining sales managers.

Assigning a segment to a contact
If you open a profile of one of the contacts and scroll to the bottom, you will find a section called Segmentation. If you click on the pencil icon next to segmentation and you will be able to see our new segmentation. Select the sales manager you would like for this contact and hit Save. It will look something like this with a segment now assigned.

Setting up a campaign with dynamic sender
Now that we have everything in place, we are ready to set up our campaign with dynamic sender name and email.
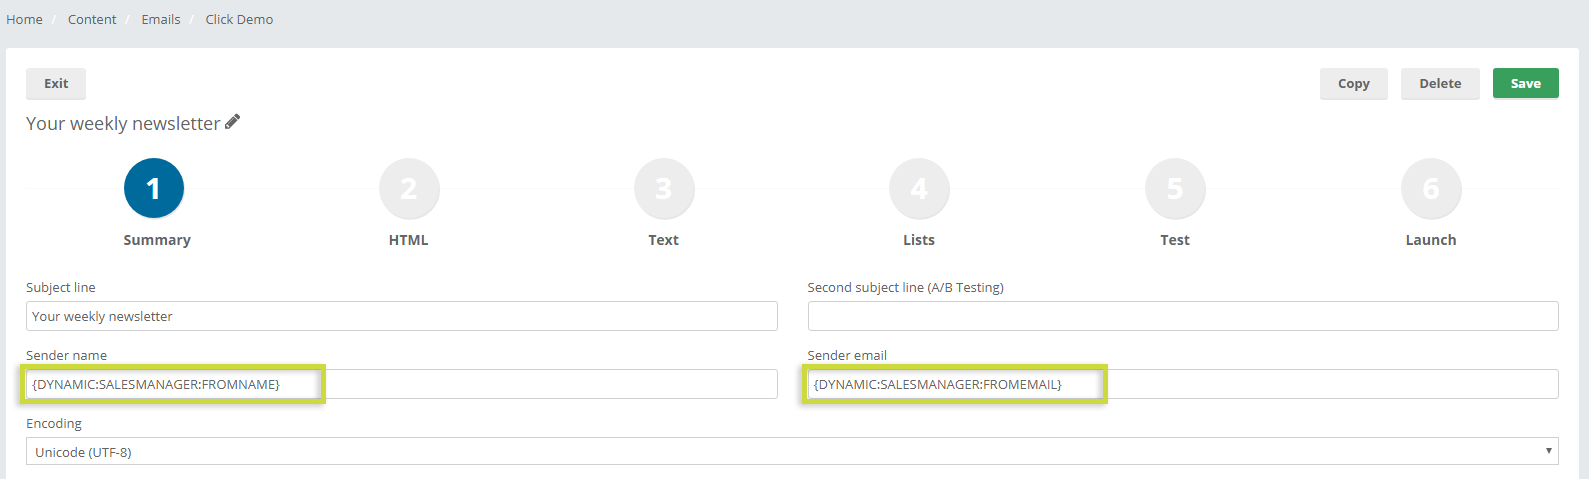
Click on Content > Emails > New email as you normally would to create an email. Now this time in the Summary tab where you have Sender name and sender email you input the below:
- Sender name – {DYNAMIC:SALESMANAGER:FROMNAME}
- Sender email – {DYNAMIC:SALESMANAGER:FROMEMAIL}
Once done, it should look like the image below.
Note the structure of the dynamic link. It is important not to have any space between the characters, like this:
- { DYNAMIC : Dynamic System Name : FROMNAME or FROMEMAIL}
This will cause the page to not save and will ask you to input the correct Dynamic System Name.
*IMPORTANT: It’s very important to make sure that each contact on the list you are sending the email to, have their segment assigned. Without any segmentation the email will not be delivered.
Learn how to bulk assign a segment to a contact list.
Updating Sales Manager dynamic sign offs
If you have an Admin profile you can manage the signoffs yourself:
- Go to Options > Segments
- Click on Sales Manager
- Navigate to Segments, find the Sales Manager you wish to update and click into the display name
- In the Dynamic Field section find the Signoff field and update the information shown in the HTML Content and Text Content sections

- Please be careful not to delete any of the HTML code
- Finally, Save the changes
If you need help updating these please email us at support@stoneshot.com.
Viewing Sales Manager dynamic sign offs
If you’ve already set up your Sales Manager segments and want to check that the sign offs are up-to-date then there’s several ways you can do this.
1. Use the simulate dynamic content function within the email template – useful for quick checks on new or a handful of signoffs where details may have changed i.e. job titles
- Navigate to Content > Emails
- Locate an email which pulls in the sign-off dynamically using the preview icon shown – this would typically be a tag like {DYNAMIC:SALESMANAGER:SIGNOFF}

- Once you found an email, click into the name of the template and navigate to the Test section. You should see a dropdown with the full list of Sales Managers. Choose the Sales manager you want to check and select Preview. A popup will appear with a preview of the email contents, including the populated dynamic signoff for that particular Sales Manager.
- You can also send a test to either your own or to a colleague’s inbox.
2. Export all the Sales Managers’ signoffs into Excel
- Navigate to Options > Segments
- Find the segmentation called Sales Manager and click into it
- Click into Segments and then Export into Excel

Reassign a contact’s Sales Manager
Managing your contact list with proper and up to date segmentation allows you to send customized and relevant content to your customers and will give a boost to your marketing strategy. The Sales Manager segment can be updated one by one against a contact or in mass via the bulk assign tool.
To reassign an individual contact’s sales manager:
- Click into the contact’s profile.
- Scroll down to the Segmentation section and click on the pencil icon to edit the segment information.
- Find the Sales Manger segment and reassign the contact via the dropdown. Click Save once you’ve made your revision.
To reassign the sales manager for a group of contacts:
- Navigate to Contacts > Lists and create a new dynamic list.
- Click on the blue arrow on the right side of the page to open the Edit panel. In the Filters tab, click the Segments option.

- Filter according to the Sales Manager segment and for the value, select the sales manager the contacts are currently assigned to. Hit Apply.
- Once your list populates with the contacts, click Actions > Bulk assign contacts located in the top right of the page.
- Select Sales Manager as the Type.
- Then, choose the sales manager you wish to reassign the contacts to from the dropdown. Make sure to check the Overwrite existing values box and hit Save.

- To bulk assign to different sales managers, contact support@stoneshot.com.
Watch our video on setting up a Dynamic Sender below.
